
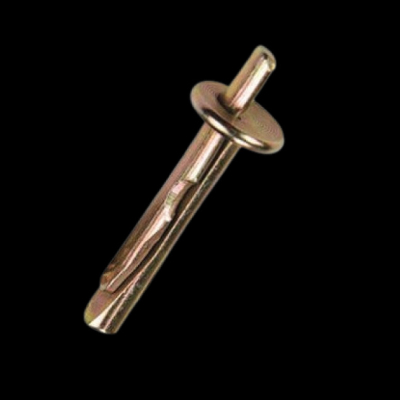
CAN CEILING ANCHOR
CAN Ceiling Anchor for Controlled, Specified Fixing into Concrete Soffits
A ceiling connection carries a different kind of responsibility from an ordinary wall fixing. The fastener is commonly loaded in tension, it may be hidden after services or a false ceiling are installed, and access for correction becomes difficult. A CAN ceiling anchor is therefore best selected as part of a complete fixing detail—not as an isolated item chosen only by diameter or lowest unit price.
Shree OSR Enterprises supplies industrial fasteners and anchoring products for contractors, MEP installers, ceiling specialists, fabricators, project buyers and maintenance teams. This page is designed to help a buyer prepare a technically useful enquiry for a CAN ceiling anchor used in a concrete ceiling or soffit. It explains the questions that determine a dependable fixing: what is being supported, how the load reaches the anchor, what substrate receives it, which connection end is required, how corrosion will be managed and how the installation will be verified.
The term “CAN ceiling anchor” is used in the market for a family of mechanical overhead fixings rather than a single universal specification. Product geometry, shield arrangement, working end, finish and dimensions can vary. For that reason, the right quotation starts with project information. Share the drawing or fixture detail, anchor quantity, proposed size, concrete information and required documents. The team can then respond against the requested configuration instead of assuming that two visually similar anchors are interchangeable.
What a CAN Ceiling Anchor Does
A post-installed ceiling anchor creates a connection after the concrete has cured. The installer drills into the soffit, places and sets the anchor according to its particular mechanism, and connects the hanger, rod, eye, hook, bracket or other specified component. The anchor transfers action from that connected part into the surrounding concrete. In a simple description this sounds like “drill, insert and hang,” but the actual load path includes every interface: supported item, connector, thread or eye, anchor body, expansion zone and concrete member.
Supported item
Ceiling frame, service support, bracket or other approved assembly creates the imposed load.
Connector
Wire, rod, bolt, hook or compatible hardware transfers load without unintended bending or poor engagement.
Anchor body
The selected ceiling anchor receives the connection and develops resistance through its designed geometry.
Expansion zone
Correct setting produces contact and mechanical interlock or friction in the prepared hole.
Concrete member
The slab or beam must have adequate strength, thickness, edge distance and reinforcement conditions.
Why overhead orientation matters
A ceiling fixing commonly experiences sustained tensile demand: gravity continually pulls the suspended item away from the soffit. Installation dust also behaves differently overhead; debris can remain in the hole or fall toward the installer, and poor visibility can hide incomplete setting. Once the ceiling closes, a fixing may be difficult to inspect. These conditions reward a repeatable method, a correct drill bit, reliable depth control, appropriate personal protective equipment and a hold-point inspection before concealment.
The anchor must not be treated as a substitute for the structure. Even a correctly made fastener cannot compensate for weak, cracked, honeycombed, thin or unknown concrete. Nor can a larger anchor automatically cure inadequate spacing or proximity to an edge. Mechanical expansion creates local stresses, and anchors placed too close together can have overlapping zones of influence. An engineer or competent designer should evaluate the complete arrangement where loads, consequences or site conditions demand it.
CAN ceiling anchor versus generic “ceiling fastener”
Search terms often mix several products: expansion shields with eyes or hooks, internally threaded drop-in anchors, projection anchors, concrete screws, wedge anchors and chemical systems. They are not synonyms. An internally threaded anchor can accept a removable bolt or threaded rod; an eye provides a ring connection; a hook serves a different attachment method; a projecting stud suits a bracket or plate. Review the related guide on projection bolts versus eye-bolt anchors when the working end is still undecided.
Where Ceiling Anchors Are Considered—and Where They Should Not Be Assumed
A useful product description distinguishes realistic applications from automatic approvals. A CAN ceiling anchor may be considered for supported building services and ceiling systems when the exact product data, concrete condition and project design permit it. The examples below are an enquiry checklist, not a declaration that one anchor variant is suitable for every listed use.
Ceiling and interior systems
- Suspended or false-ceiling framework
- Ceiling hangers and approved wire connections
- Light service brackets above accessible ceilings
- Interior fit-out support points shown on coordinated drawings
Coordinate fixing locations with slab depth, reinforcement scans and other trades before drilling.
MEP support work
- Approved threaded-rod suspension details
- Cable tray or conduit support assemblies
- Light duct or service-support brackets
- Individual pipe-support arrangements
The support assembly, not merely the anchor, must address load, spacing, vibration and service access. See the ceiling wire hanger and clevis hanger clamp ranges for related components.
Industrial and maintenance fixing
- Small overhead brackets within approved limits
- Utility supports in plant rooms
- Retrofit fixing where cast-in points were not provided
- Replacement of a specified compatible anchor type
Existing concrete condition, corrosive exposure, dynamic effects and change-of-use must be reviewed rather than inherited from an old installation.
Application does not establish capacity
Labels such as “for false ceilings” or “for MEP” describe a market, not a design value. A light ceiling over a small room and a service-dense ceiling in an industrial plant can impose very different demands. Dead load is only one part of the picture. The designer may also need to consider construction loads, accidental impact, vibration, maintenance activity, thermal movement, seismic action, redundancy and the consequence of one support failing.
Likewise, knowing the total suspended weight is not enough to divide it evenly by the number of anchors. Real support reactions can be uneven. Layout tolerances, stiffness differences, load eccentricity and local geometry may concentrate demand. The specified load per fixing should come from the relevant system design or engineering calculation, with the applicable safety factors and combinations—not from an informal average.
The Five-Part Specification Workbench
1. Define the connection
State what physically attaches to the anchor. Is it a wire, threaded rod, bolt, hook, shackle, bracket or proprietary ceiling-system component? Include the thread form and required engagement where threaded parts meet. A compatible diameter alone does not guarantee correct thread pitch, sufficient engagement or suitable geometry.
Show whether the load is concentric with the anchor axis or offset. An eccentric bracket can introduce bending and prying that a simple axial-load assumption misses. If a hook or eye is used, describe the mating component and ensure it cannot unintentionally disengage or bear on a sharp, undersized contact area.
2. Define the base material
Identify normal-weight concrete, lightweight concrete, masonry, block, brick, plaster or another substrate. Do not call everything above a ceiling “RCC” without checking. Record concrete grade or compressive strength if known, member thickness, age and visible condition. Confirm whether drilling is into a slab soffit, beam or precast element.
Existing structures may contain repairs, voids, reinforcement, post-tensioning tendons or embedded services. Use approved scanning and drilling procedures. A ceiling anchor intended for dense concrete should not be transferred to hollow block or aerated material merely because the drilled diameter is the same.
3. Define the actions
Provide the design tension and shear demand at each fixing, including any combined action. Distinguish permanent load from variable, cyclic, vibration, impact, seismic or temporary construction effects. State the required design life and consequence category if the project documents define them.
Do not convert an ultimate test result into a safe working load by applying an arbitrary factor. Test method, statistical treatment, concrete strength, edge conditions and failure mode all matter. Use the product-specific resistance values and design method accepted by the responsible engineer.
4. Define geometry
Record anchor size, drill-hole diameter, hole depth, effective embedment, minimum member thickness, spacing and distance to concrete edges. These dimensions interact. Deeper is not automatically safer if the member is thin, reinforcement is struck or installation differs from qualified data.
Review the site’s embedment depth and edge-distance guide for a practical explanation, then rely on the exact supplied product data for final values.
5. Define environment and documentation
Describe dry internal exposure, periodic humidity, condensation, washdown, chemical atmosphere, external weather or coastal/chloride conditions. Material and coating choices should follow the real exposure and design life. A bright finish is not proof of stainless steel, coating thickness or long-term corrosion performance. Request the grade or finish in writing and do not mix dissimilar metals without considering galvanic effects.
List required documents in the enquiry: dimensional drawing, material declaration, finish/coating information, installation instruction, batch or inspection certificate, product test report, approval or compliance document and packing/traceability requirement. If a project invokes an external design framework, verify that the exact product has the necessary assessment. The American Concrete Institute’s anchor-in-concrete overview explains the broad distinction between cast-in and post-installed anchors; the EOTA EAD directory provides European assessment documents. These are technical references, not claims that this product holds a particular approval.
Choose by Function, Not by Familiar Name
A buyer may begin with “CAN anchor chahiye,” but the procurement team needs a more exact decision trail. Use the following questions to turn a market name into an orderable, reviewable fixing.
Installation Control: From Approved Point to Recorded Fixing
Always follow the installation instruction issued for the exact supplied anchor. The sequence below is a planning framework, not a substitute for product-specific dimensions, tools or setting criteria.
Approve the location
Compare the coordinated services drawing with the structural information. Check edge distance, spacing, slab or beam thickness and exclusion zones. Scan for reinforcement, embedded conduits and post-tensioning tendons using an approved procedure. Relocation should be authorised; moving a fixing on site can change support geometry and load distribution.
Verify product and tools
Confirm label, size, material/finish, batch and compatibility with the drawing. Check the drill, correct bit diameter, depth stop, cleaning equipment, setting tool and inspection gauge if specified. A worn bit may create a different hole from a new bit even when both carry the same nominal marking.
Drill safely and squarely
Mark the point and drill to the specified diameter, depth and orientation. Avoid enlarging the hole by rocking the drill. Overhead drilling requires eye, face and respiratory protection appropriate to the dust and work method. Use dust extraction where required. Stop if the bit strikes reinforcement or an unknown obstruction; do not cut through it without approval.
Clean the hole
Remove drilling dust using the method prescribed for the anchor. Brushing, blowing or vacuuming must use correctly sized, serviceable equipment and the required sequence. Dust left at the expansion zone can prevent full insertion or setting. Overhead orientation does not make cleaning optional.
Insert and set
Place the anchor without damaging its thread or working end. Use only the specified setting method and matching tool. Do not substitute an improvised punch, random bolt or uncontrolled impact. Verify embedment and the visual or dimensional set indicator defined for that product. If torque is specified, use calibrated equipment and the stated value.
Connect without abuse
Install the wire, rod, bolt, eye connection or bracket with compatible hardware. Obtain the specified thread engagement; avoid cross-threading. Do not bend an eye, open a hook, weld to the anchor, grind it for clearance or add site-applied heat unless a written engineered procedure permits the modification.
Inspect before concealment
Check anchor identity, location, spacing, embedment/set, connected hardware and visible concrete condition. Record nonconformities and replacement locations. A concealed ceiling should not be closed until the agreed inspection hold point is released. Photographs and a marked-up drawing can provide useful traceability.
Manage damaged holes
An oversized, spalled, angled or abandoned hole is not repaired by inserting another identical anchor and hoping for grip. Follow the engineer’s approved remediation or relocation detail. Maintain minimum distance from the rejected hole because it may affect the surrounding concrete.
Installer briefing
Give installers a sample anchor, current instruction and accepted mock-up before production begins. The site’s anchor installation checklist is a useful toolbox-talk companion. For formal inspection competency and international training context, see the ACI post-installed concrete anchor inspection program. Apply the project’s governing Indian codes, contract requirements and approved method statement.
Seven Failure Routes a Good Specification Closes Early
1. Wrong base material
An expansion anchor selected for sound concrete is installed into weak masonry, hollow block, a repair patch or a void. The mechanism cannot develop the resistance assumed in the design. Prevention begins with substrate identification, drawings, scanning and trial verification where the engineer requires it.
2. Hole outside tolerance
The bit is wrong, worn or rocked; the hole is shallow, oversized or angled. The anchor may appear installed but its expansion zone does not contact the concrete as intended. Use controlled drilling, depth stops and routine bit checks.
3. Incomplete setting
An improvised tool or inconsistent hammering leaves the mechanism partly expanded. The worker then connects the load without confirming set depth. Use the matching setting tool and the product’s acceptance indicator.
4. Geometry conflict
Anchors sit too close to an edge, thin slab zone, abandoned hole or one another. Local concrete stresses overlap and the available resistance can fall. Layout review must occur before drilling, not after every hanger has been installed.
5. Corrosion mismatch
A finish chosen for a dry interior is installed in condensation, washdown or coastal exposure. Corrosion can reduce section and make inspection difficult above a closed ceiling. Specify the environment, material and design life together.
6. Unapproved substitution
A supplier or installer replaces the scheduled anchor with a visually similar product. Diameter may match while embedment, mechanism, steel grade, approval or resistance differs. Treat substitutions as technical submittals, not purchasing shortcuts.
7. Changed load or service
New cable trays, pipes or equipment are attached to an existing support without reviewing spare capacity. An anchor accepted for one arrangement is not automatically approved for future additions. Record installed supports and require review for modifications.
Cracked concrete is a design condition
A soffit can be in a tension zone, and cracks may occur even when none are visible during installation. Read cracked versus non-cracked concrete. Do not claim cracked-concrete suitability unless the exact anchor’s qualification supports it.
Pull testing, where specified, should follow an approved sampling plan, test method, acceptance criterion and response to failures. A random site test does not create a product rating or replace design. Proof load, test load and ultimate failure load are different concepts. Excessive testing can also damage an anchor or substrate. Let the responsible engineer define what is tested, how results are recorded and whether tested anchors remain in service.
How to Request a Useful CAN Ceiling Anchor Quotation
“Send CAN anchor price” invites assumptions and makes quotations difficult to compare. A structured RFQ lets the supplier quote the same technical requirement and lets procurement evaluate more than piece rate.
Include in your enquiry
- Product name and preferred working-end type
- Thread or nominal anchor size, if already designed
- Required length and embedment/detail reference
- Concrete type, grade, member thickness and condition
- Design tension, shear and any dynamic/seismic requirement
- Minimum spacing and edge distance available
- Indoor, damp, outdoor, coastal or chemical exposure
- Material grade and coating/finish requirement
- Quantity, pack size and phased delivery schedule
- Project city, site access and required delivery date
- Drawing, BOQ item and consultant specification
- Required certificates, tests, samples and inspection
Compare supplier responses on
- Exact configuration offered—not only the trade name
- Dimensional compliance and tolerances
- Documented base-material scope
- Product-specific installation instruction
- Material and corrosion-protection declaration
- Load/resistance data relevant to the design basis
- Batch traceability and inspection documents
- Setting tool and accessory availability
- Sample or mock-up support when requested
- Lead time, dispatch plan and packing protection
- Technical deviations stated transparently
- Total installed value, including tools and rework risk
“Please quote CAN ceiling anchors for [supported item/application], connection type [eye/hook/thread/rod/bracket], proposed size [___], base material [___ concrete grade], member thickness [___], design action per fixing [tension ___ / shear ___], spacing and edge distance [___], exposure [___], required material/finish [___], quantity [___], delivery to [city/PIN], along with dimensional drawing, installation instruction, material/finish declaration, relevant test data, batch documentation and quotation validity. Please identify every deviation from the attached specification.”
For broad sourcing, browse the heavy-duty anchors category or the complete product catalogue. For a project-specific response, use the contact page and attach the BOQ or detail. Keeping this product page focused on ceiling-anchor selection—rather than duplicating every catalogue item or city page—creates a clearer search destination and reduces doorway-page risk.
Four Project Scenarios That Change the Anchor Enquiry
The product name can remain the same while the correct questions change with the job. These scenarios show why useful CAN ceiling anchor content must do more than repeat “high strength, durable and easy to install.” They also help buyers recognise the information missing from an early BOQ.
Commercial false ceiling in a new RCC building
The ceiling contractor receives coordinated reflected-ceiling drawings and a system support schedule. Concrete is new, but the soffit includes beams, service openings and congested reinforcement near selected zones. The correct enquiry identifies the ceiling-system hanger, proposed anchor connection, support spacing, concrete grade, slab thickness and exclusion zones. The contractor should also confirm whether the ceiling manufacturer’s tested system requires a particular fastener category or corrosion protection.
Site planning matters as much as supply. The installer needs an accepted sample, correct drill bit, depth control and setting tool. Locations should be coordinated before multiple trades occupy the ceiling void. If a point conflicts with reinforcement, it cannot simply be shifted until the hanger “looks vertical”; the relocation must preserve the approved grid and support reaction. Inspection should occur before boards or panels conceal the fixing. Here, value comes from repeatability, packaging by work zone, tool availability and a clear hold point—not from choosing an anchor on unit price alone.
MEP retrofit above an operating facility
A maintenance project adds cable trays or lightweight services above an existing accessible ceiling. Drawings are incomplete, concrete condition varies and legacy supports already carry unknown additions. The buyer should not ask for “the same anchor already used.” Existing fixings may have different sizes, finishes or installation quality, and their spare capacity is unknown. The project first needs a survey, substrate confirmation, scanning plan and an approved support layout.
The enquiry should state restricted work hours, dust-control requirements, required delivery batches and whether trial installations or site tests are specified. Corrosion or condensation above the old ceiling may change the material decision. New loads should be supported by newly designed points rather than casually sharing unidentified hangers. Records are especially valuable in retrofit work: mark new anchor zones, capture batch and installation data and update the facility drawing. This creates a maintainable system instead of another layer of anonymous hardware.
Industrial plant room with vibration and humidity
A plant-room support may carry a small pipe, conduit, instrument tray or bracket, yet its environment can be more demanding than a much heavier static ceiling. Equipment vibration, start-stop cycles, condensation, washdown and chemical vapour can affect both the action and the material choice. A generic dry-interior anchor specification is therefore incomplete.
The technical enquiry should identify dynamic or cyclic action, temperature range, moisture, chemicals, design life and connected-metal materials. The engineer must determine whether a mechanical expansion anchor is appropriate and which product qualification or resistance data apply. The installer also needs adequate clearance for drilling and setting around existing equipment. If a hole must be angled because access is poor, the detail should be redesigned rather than accepting an installation outside the instruction. Inspection intervals and access after installation may be part of the maintenance plan. In this case, coating or stainless grade, connection locking method and fatigue considerations may influence value more than the nominal anchor diameter.
Multi-city procurement for a repeat fit-out format
A contractor may want one CAN ceiling anchor specification for retail or office projects in several Indian cities. Standardisation can reduce purchasing complexity, but it should be based on a controlled design envelope. Concrete strength, slab type, exposure, ceiling system, load and installation capability must fall within that envelope at every site. A product accepted at one project is not automatically transferable to a precast slab, thin topping, hollow unit or coastal environment elsewhere.
The central procurement package should define the approved product code and description, accepted alternatives, submittal documents, setting tools, packaging label and inspection method. Each site should verify base material and deviations before release. Phased dispatch can be organised by city and installation programme, but packs must retain identification and batch traceability. When a site condition falls outside the standard detail, it should trigger technical review instead of an informal local purchase. This approach delivers real consistency without turning location pages into duplicated doorway content or treating geography as a technical specification.
How to read an incomplete BOQ line
A line such as “providing and fixing approved ceiling anchors complete” usually leaves several commercial and engineering questions unresolved. Before comparing rates, convert it into a clarification schedule:
- Scope: supply only, or supply plus drilling, cleaning, setting, connected hanger and testing?
- Measurement: per anchor, per support assembly, per metre of service or included in a ceiling-system rate?
- Product: exact working-end type, size, material, finish and accepted manufacturer/product data?
- Base: concrete type, minimum strength, thickness, cracked condition and restricted drilling zones?
- Design: action per support, redundancy, spacing, edge distance and special seismic, fire or dynamic requirements?
- Installation: access equipment, power, dust control, scanner, consumable bits, setting tools and supervision?
- Quality: submittal, mock-up, inspection frequency, testing, records, rejected-hole treatment and handover?
- Logistics: quantity split, wastage policy, delivery dates, packing, unloading, secure storage and replacement lead time?
Issue these questions before tender close. Otherwise, one supplier may quote only loose anchors while another includes tools, certificates and project packing; their unit prices will not represent the same scope. A technically aligned quotation protects both buyer and supplier from late substitution and variation disputes.
Quality Is a Chain: Incoming Material to Concealed Installation
An anchor can arrive correctly and still be installed incorrectly; it can also be installed neatly while being the wrong grade or configuration. A practical quality plan has gates across purchasing, receipt, storage, installation and handover.
Incoming inspection points
Sample dimensions according to the project’s inspection plan rather than measuring only one convenient piece. Look for damaged threads, deformed eyes or hooks, incomplete components, mixed sizes, rust, plating damage, burrs and illegible packaging. Confirm nuts, washers, setting tools and mating parts where these form part of the order. Segregate nonconforming material so it cannot return to the installation area unnoticed.
Storage and handling
Keep anchors dry, identified and separated by size, material and batch. Do not tip different variants into a common bin. Protect threaded parts from impact and contamination. If stainless and carbon-steel products are both present, maintain identification and good handling practice to avoid mix-ups and contamination. Follow the supplier’s storage requirements for any proprietary components.
Sample approval without creating a false equivalence
A physical sample helps the buyer check dimensions, connection geometry, finish and setting-tool compatibility, but visual approval alone does not establish structural equivalence. Keep the sample label and offered product code with the submittal. If a later batch looks different, pause and compare the drawing, material declaration and revision rather than accepting it because it still fits the same drill hole. Conversely, a harmless manufacturing or packaging change should be reviewed against technical requirements instead of rejected only because its appearance changed. The approved submittal, not colour or shape memory, remains the control document.
For a mock-up, record the concrete location, drill and bit, hole depth, cleaning sequence, setting method and acceptance observation. A mock-up demonstrates that the planned method can be executed under representative site conditions; it does not authorise installers to relax the method during production. Use it to brief the crew and resolve access, dust, tool and inspection issues before work accelerates.
What traceability should mean
Traceability is the ability to connect installed material to an accepted product and batch—not simply the presence of a generic certificate in an office file. The required level depends on the project. It may include delivery challan, packing label, batch number, material or inspection certificate, approved submittal, installation record and marked-up zone drawing. Agree this level before dispatch so packaging and documents support it.
Built for the Questions Different Project Teams Actually Ask
Contractors and installers
Need a consistent product, matching setting method, reliable availability and a detail crews can repeat above hundreds of ceiling points. Share the installation sequence and daily consumption so tools, packs and dispatches align with site work.
MEP and ceiling specialists
Need coordination across ducts, trays, pipe supports and ceiling grids. Provide the support schedule, working-end preference and planned hanger interface. Review related sprinkler hanger clamps, conduit clamps and slotted C channels only where those components fit the approved assembly.
Consultants and engineers
Need an unambiguous product, resistance basis, base-material scope, geometry, installation instruction and documented deviations. The enquiry should identify the governing specification rather than asking the supplier to guess a design standard.
Procurement teams
Need comparable quotations, packing data, lead time, batch documents and commercial terms. Lowest price per piece can be misleading if one offer excludes setting tools, documentation, corrosion protection or the specified variant.
Fabricators and system integrators
Need dimensional compatibility between the anchor and a bracket, rod, eye or proprietary assembly. Send connection drawings and tolerances early; do not machine or weld a purchased anchor to force compatibility after delivery.
Facility and maintenance teams
Need identification of existing fixings, replacement compatibility and control of added loads. Treat an unknown ceiling point as unverified until records, inspection or engineering assessment establishes what it is and what it can support.
Shree OSR Enterprises serves project and bulk fastener requirements across India. Supply discussions can cover quantity, configuration, packing, phased deliveries and requested documentation. Availability and specifications should always be confirmed at enquiry stage. If the requirement includes several fixing families, provide a consolidated BOQ so obvious interface conflicts—different rod threads, materials, finishes or tool requirements—can be identified before dispatch.
CAN Ceiling Anchor FAQs
What is a CAN ceiling anchor?
It is a market term for a mechanical fixing used to create an overhead connection in a suitable base material, commonly concrete. Depending on the variant, it may use an eye, hook, threaded connection or other working end. Because the name can cover more than one geometry, buyers should specify size, connection type, substrate, load, material/finish and required documentation rather than relying on the name alone.
Can it be used for a false ceiling?
It may be considered for an approved false-ceiling support detail when the exact product, concrete, load, spacing, installation and project specification permit it. False ceilings are systems: hangers, channels, connectors and anchors all need compatible capacities and spacing. Follow the ceiling-system designer’s detail and the anchor manufacturer’s data.
What sizes are available?
Size availability must be confirmed against current supply and the exact product configuration. Do not publish or order a size range until thread diameter, overall length, shield dimensions, embedment and working-end geometry have been verified. Send the BOQ or drawing to receive a quotation for the required variant.
What is the load capacity of a CAN ceiling anchor?
There is no responsible single capacity for the trade name. Resistance depends on the exact anchor, material, concrete strength and condition, embedment, spacing, edge distance, load direction, installation and assessment method. Ask for product-specific data and have the responsible engineer compare it with design demand using the governing code and safety factors.
Can I use the same anchor in brick or hollow block?
Not unless the exact product is specifically documented and approved for that substrate. A concrete expansion anchor should not be assumed suitable for brick, hollow block, AAC or plaster. Those materials require their own fixing strategy and often a different mechanism.
Is a ceiling anchor the same as a drop-in anchor?
No. A drop-in anchor is usually an internally threaded expansion anchor set flush in concrete; it then accepts a separate bolt or threaded rod. A CAN ceiling anchor may have a different shield and working end. Compare the actual product drawings and read the site’s wedge versus drop-in anchor guide for context.
Should I choose an eye, hook or projection type?
Choose the working end that matches the approved connection. An eye supports a ring-style connection, a hook serves a compatible retained attachment, and a projecting threaded stud suits a plate or bracket. Consider disengagement risk, thread engagement, load alignment and whether the connection must be removable.
Can ceiling anchors support fire-protection services?
Only where the complete support system and exact anchor meet the applicable fire-performance, service and project requirements. A generic metal anchor is not automatically a fire-rated fixing. Request the specific documentation and consultant approval required for sprinkler, smoke-control or other life-safety systems.
Can they be used in cracked concrete?
Only if the exact anchor has suitable product-specific qualification and the design accepts it. Visible crack absence is not proof of non-cracked design conditions. Soffits may be tension zones. The structural designer should define the concrete condition and use the applicable design data.
How far should anchors be from an edge or from each other?
Use the product-specific minimum edge distance and spacing together with the design calculation. Values vary by anchor, embedment, concrete strength, load and condition. Do not apply a generic multiple of diameter when the connection is engineered or safety-relevant.
How is the drill-hole diameter selected?
Use the exact installation instruction for the supplied anchor. The nominal thread or working-end diameter may not equal the drill-hole diameter. Confirm the bit type, hole diameter, minimum depth, cleaning sequence and setting tool before work starts.
Can an anchor be installed in an abandoned or oversized hole?
Not by default. An oversized, damaged or previously used hole can prevent the mechanism from setting correctly. Mark it, stop work and follow an approved relocation or repair detail. The new anchor may need to be kept a specified distance away.
Can I reuse a removed ceiling anchor?
Treat mechanically expanded anchor bodies as non-reusable unless the manufacturer explicitly permits reuse. A removable bolt or rod does not mean the embedded anchor can be extracted and reset elsewhere. Replace damaged, modified, corroded or questionable parts.
Is stainless steel always required?
No single material is automatically right for every project. Dry interior, damp, exterior, coastal and chemical exposures differ. Choose a documented grade or protective finish for the environment, design life and connected metals. Confirm the exact material rather than judging by colour or polish.
Can I weld, bend or grind the anchor on site?
Do not modify an anchor unless a written, technically approved procedure expressly allows it. Welding or heating may change material properties and coatings; bending can create cracks or harmful residual stress; grinding reduces section and corrosion protection. Order a compatible geometry instead.
Is pull testing mandatory?
Testing requirements depend on the specification, risk, product and governing framework. Where required, the engineer should define sampling, test load, equipment, procedure, acceptance, records and action after failure. Site proof testing does not replace product qualification or design.
How should ceiling anchors be inspected?
Inspection should cover product identity, substrate, location, drill-hole process, cleaning, embedment/set, connection hardware, spacing, edge distance and visible damage. Complete inspection before concealment. Record batch and location where project traceability requires it.
What information is needed for price?
Provide size or drawing, working-end type, material/finish, quantity, base material, application, delivery city, required date and documentation. If size has not been selected, share the supported-item detail and design loads so the enquiry can be reviewed rather than guessed.
Do you supply bulk CAN ceiling anchors in India?
Shree OSR Enterprises handles industrial fastener enquiries and project quantities across India. Current configuration, minimum quantity, packing, lead time and delivery should be confirmed through a formal quotation. Use the contact page and attach the BOQ for an efficient response.
What should I do before placing a repeat order?
Reference the previous purchase order, exact description, batch or drawing and confirm that the project requirement has not changed. Do not rely only on a photo or old informal name. Recheck quantity, finish, documents, site destination and whether the earlier installation produced any nonconformities.
Send the Detail. Receive a More Accurate Anchor Quote.
Share your CAN ceiling anchor size, application, concrete information, load requirement, material or finish, quantity, project city and document list. If the selection is still open, attach the support drawing or BOQ and identify the governing specification.
Technical suitability remains subject to the exact offered product, approved design, base material and installation. Product availability, specifications, test documentation and delivery schedule must be confirmed in the formal quotation.