
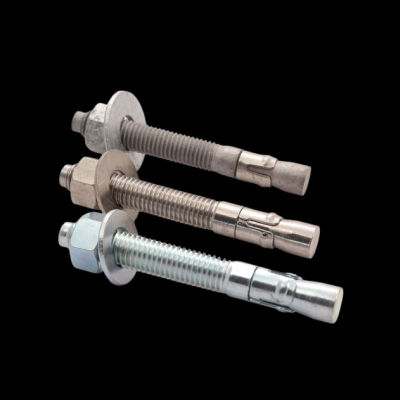
WEDGE ANCHOR(Stainless Steel & Mild Steel)
Get all size(M8 To M24) Mild Steel & Stainless Steel Wedge Anchors in your city, we are well known supplier & manufacturer of Mild Steel & Stainless Steel Wedge Anchors.
Note: We make all size Mild Steel & Stainless Steel Wedge Anchors as per customer requirement.
| Size | M8 To M24(All Size available) |
|---|---|
| Material | Mild Steel |
| Packaging Type | As per requirement |
| Minimum Order Quantity | 100 Piece |
Concrete anchoring, specified correctly
Choose a wedge anchor as a complete fixing system—not by diameter alone
A wedge anchor is a permanent mechanical fastener for fixing a steel plate, bracket, frame or piece of equipment to solid concrete. Its familiar appearance—a threaded stud with a nut, washer and expansion clip—can make selection look simple. In practice, a reliable fixing depends on several connected decisions: the concrete condition, the forces at the connection, anchor diameter, effective embedment, fixture thickness, edge distance, spacing, steel material, surface protection, hole preparation and installation torque.
Shree OSR Enterprises supplies mild-steel, zinc-plated, hot-dip-galvanized, SS304 and SS316 wedge anchors for construction, industrial and infrastructure requirements. The listed range covers commonly requested metric diameters and lengths, with M8 to M24 among the main project sizes and additional availability to be confirmed against the exact enquiry. Buyers can request standard or requirement-based packaging for bulk procurement across India.
This page is designed for more than a quick product search. It helps contractors, fabricators, EPC teams, maintenance departments, distributors and procurement managers translate a site requirement into a clear purchase specification. That matters because two anchors described as “M12 wedge anchors” may not be interchangeable when their length, material, coating, steel grade, thread, expansion geometry or approved performance data differ.
What makes wedge anchoring a system decision?
The fastener, concrete and installation process work together. A strong anchor installed in weak, cracked or unsuitable base material will not deliver the expected result. A correct anchor in an oversized or dust-filled hole may not expand consistently. An indoor coating exposed to coastal air can become a maintenance problem. A longer stud does not automatically mean a better connection if the required embedment, fixture clearance and concrete thickness are not checked.
For that reason, this guide does not publish a generic “safe load” or one torque value for every product. Design resistance and installation settings must come from the approved data for the exact anchor, size, embedment, concrete condition and exposure. For structural, overhead, seismic, façade, barrier, safety-critical or life-safety work, the responsible engineer must approve the fixing system and installation procedure.
If you are comparing several fastener families before specifying, begin with our industrial fastener selection guide. If the decision is already limited to anchors, continue below with the concrete, material and installation checkpoints that separate a dependable order from a diameter-only purchase.
How to install a wedge anchor with controlled site checks
The following sequence explains the quality logic of wedge-anchor installation. It is not a substitute for the instructions supplied with the exact approved anchor. Hole size, embedment, cleaning method, setting position and torque must follow that product data and the project method statement.
Verify the approved anchor and location
Before drilling, match the product, diameter, length, material and finish to the drawing or anchor schedule. Confirm the concrete member, fixture mark, edge distances and spacing. Scan for reinforcement, post-tensioning, electrical conduits, plumbing or other concealed services using the approved site procedure. Stop when the proposed hole conflicts with reinforcement or when the actual concrete condition differs from the design assumption.
Position and secure the fixture
Set the plate or bracket in its final orientation. Check line, level and hole alignment before using the fixture as a drilling template. Uneven bases, oversized slots, thick paint, loose packers or an unapproved grout gap can change how the washer bears and how loads enter the anchor group. Resolve these conditions instead of pulling a distorted plate flat by over-tightening the nuts.
Use the specified drill and bit
Drill perpendicular to the surface unless the approved detail says otherwise. Use the stated drill type and a correctly sized, serviceable bit. Control depth with a gauge or marked bit rather than guesswork. A hole that is shallow may prevent full insertion; an excessively deep hole may be unnecessary or risk conflict with reinforcement and services. Avoid reaming the hole by rocking the drill.
Clean the hole completely
Remove drilling dust using the documented blow–brush–blow, vacuum or other approved sequence. Use a brush that is suitable for the hole size and equipment that removes dust from the full depth. Protect workers from airborne silica and follow site safety requirements. A hole that looks clean at the surface can still hold compacted dust at its base.
Insert without damaging the thread
Assemble the washer and nut as instructed, generally leaving the nut level with or slightly below the stud end so hammer impact does not deform the first thread. Drive the anchor through the fixture and into the cleaned hole using appropriate tools. Stop at the required position. Do not grind, cut or reshape the expansion clip to make a mismatched anchor fit.
Tighten to the specified installation torque
Use a calibrated torque wrench where torque is the controlled setting method. Tighten in the approved sequence, particularly for multi-anchor base plates, so the plate seats evenly. Under-torquing may leave the expansion mechanism incompletely set; uncontrolled over-torquing can damage threads, crush a soft fixture, overstress the expansion zone or crack concrete near an edge. Impact-wrench use should be limited to what the product and method statement permit.
Inspect, record and protect
Confirm anchor position, projection, washer bearing, nut engagement, fixture seating and any visible damage. Mark or record completed torque checks according to the inspection plan. Protect exposed threads and dissimilar-metal interfaces as specified. If the installation is rejected, do not simply relocate the hole a short distance away; the engineer should approve the repair and revised spacing.
Installer’s pre-start kit
- Approved anchor schedule and current installation data
- Correct anchors, nuts, washers and identification
- Drill, approved bit and depth-control method
- Hole-cleaning brush, blower or industrial vacuum
- Calibrated torque wrench and correct sockets
- Concrete/service scanner where required
- Eye, hearing, respiratory and task-specific PPE
- Inspection sheet, rejection process and supervisor contact
Conditions that require a stop
- Cracked, spalled, honeycombed or unexpectedly weak concrete
- Hole breaks through an edge, void or underside of the member
- Reinforcement or a concealed service blocks the approved location
- Anchor spins, will not reach depth or cannot achieve controlled torque
- Expansion clip, thread, nut, washer or coating is visibly damaged
- Wrong size, material, finish or product is delivered to the workface
- Fixture sits unevenly or requires unapproved packing
- Required product data or torque value is unavailable
Do not reuse a wedge anchor that has been set, removed or damaged. Its expansion mechanism is intended to create a permanent fixing. When a change is necessary, use the approved repair procedure and a newly specified anchor at an engineer-approved location. Post-installation proof testing, where required, should use a documented sampling rate, test load, equipment and acceptance criteria—not an improvised pull check.
Six common wedge-anchor mistakes and the control for each
Many site problems begin before the nut is tightened. The most effective quality plan connects design, purchase, storage, drilling, setting and inspection.
Using a wedge anchor in hollow or weak material
The expansion clip needs a sound surrounding material. Verify the base before purchase and again before drilling. Where brick, block, AAC, deteriorated concrete or voids are present, obtain an approved alternative.
Ignoring edges, spacing and concrete thickness
An anchor creates stresses in a volume of concrete, not only at the hole wall. Closely spaced anchors, thin members and nearby edges can overlap or truncate that stressed zone. Follow the engineered layout.
Drilling oversized, angled or shallow holes
A worn bit, drill movement or poor depth control changes the intended expansion condition. Inspect bits, drill steadily and use a depth-control method. Do not repair a poor hole by adding adhesive unless an approved repair says so.
Skipping the specified cleaning sequence
Residual dust can prevent seating and alter installation feedback. Clean to full depth with the approved tools. Where wet drilling is permitted, follow the exact water-removal and preparation instructions for the anchor system.
Tightening by feel or with an uncontrolled impact tool
Experience does not replace a stated torque and calibrated tool. Record critical installations. If an anchor spins, the nut strips or the torque cannot be reached, quarantine the location for review instead of hiding the defect.
Choosing the cheapest finish for a difficult environment
Corrosion can reduce section, seize the nut and stain adjacent work long after handover. Match MS, zinc plating, HDG, SS304 or SS316 to the specification, environment and intended service life.
What if an installed anchor is loose?
Do not solve a loose wedge anchor by applying more torque, welding the nut or filling the visible gap with resin. First isolate the connection and determine whether the cause is a wrong product, unsuitable concrete, damaged anchor, incorrect hole, insufficient embedment, poor cleaning, stripped thread, fixture movement or overload.
The responsible engineer should decide whether the anchor is tested, removed, replaced, relocated or supplemented. Any new hole must maintain approved separation from the rejected hole and from concrete edges. Record the non-conformance and corrective action so the same cause does not repeat across the anchor group.
Wedge anchor vs sleeve, drop-in, chemical and Rawl-type anchors
The “strongest” anchor is not automatically the most suitable. Base material, loading, edge distance, installation access, removability, cure time and required approval determine which system fits the connection.
| Anchor family | How it engages | Typical base/material logic | Connection advantage | Important limitation |
|---|---|---|---|---|
| Wedge anchor | A tapered stud expands a clip against the drilled-hole wall as the nut is tightened. | Primarily solid concrete, subject to the exact product approval. | Fast through-fixing for permanent stud-style connections and heavy-duty applications. | Creates expansion force; not a default solution for hollow masonry, tight edges or unknown concrete. |
| Sleeve anchor | A larger sleeve expands along part of the anchor body as the bolt or nut is tightened. | Some products suit concrete and selected solid or hollow masonry; verify documentation. | Versatile general fixing with a broader expansion surface and multiple head styles. | Performance and base suitability vary; do not treat it as equal to a wedge anchor by diameter. |
| Drop-in anchor | A setting tool expands an internally threaded shell below the concrete surface. | Usually solid concrete, with product-specific installation data. | Creates a flush female thread for removable bolts or threaded-rod suspension. | Needs the correct setting tool and controlled embedment; not a through-fixing stud. |
| Chemical anchor | Resin bonds a threaded rod or rebar along the cleaned drilled hole. | Solutions exist for several base conditions, but resin, rod, cleaning and approval must match. | No expansion during setting; useful where engineered edge, embedment or reinforcement solutions are required. | Hole cleaning, resin temperature, working time, cure time and chemical compatibility are critical. |
| Rawl or shield type | A segmented shield expands as a central bolt or cone is tightened. | Commonly used in concrete or masonry according to the exact design. | Robust general anchoring family with several configurations. | “Rawl bolt” is often used generically; identify the actual product and approved base material. |
| TAM anchor | A metal expansion body grips the drilled hole as its bolt activates the mechanism. | Application depends on its specific construction and supplier data. | Useful alternative within mechanical anchor families for selected industrial fixing tasks. | Do not infer wedge-anchor performance or installation values from its similar purpose. |
Choose a wedge anchor when…
The design calls for a permanent, male stud connection through a fixture into suitable solid concrete; the required edge distance and spacing are available; fast mechanical setting is helpful; and the exact anchor has approved data for the load and concrete condition.
Review a chemical anchor when…
The project needs a bonded rod, deeper or custom embedment, reinforcement anchoring, reduced expansion pressure, or a qualified solution for conditions that the proposed mechanical anchor does not cover. Cure time and cleaning control must be acceptable.
Review sleeve or drop-in options when…
The connection needs a different base-material capability, head configuration, flush internal thread, removable bolt or suspension point. Compare the complete system and approved resistance rather than making a shape-only substitution.
Explore related products on the sleeve anchor, SS drop-in anchor, chemical anchor, Rawl bolt and stainless-steel TAM anchor pages. For a focused male-versus-female anchor explanation, see wedge anchors vs drop-in anchors.
Substitution should be documented. If a scheduled anchor is unavailable, the replacement must satisfy the same or revised design conditions, material exposure, installation constraints and approval requirements. Similar overall dimensions or a higher advertised load in an unrelated catalogue do not establish equivalence.
How a wedge anchor develops grip inside concrete
A wedge anchor is normally installed through the hole in the fixture and into a drilled hole in the concrete. The anchor body does not create a thread in the concrete. Instead, tightening the nut causes controlled movement between the threaded stud and the expansion clip around its tapered end. That motion forces the clip outward against the wall of the hole and creates the mechanical engagement that resists movement.
A matched hole is drilled
The hole diameter, depth and drilling method must follow the data for the exact wedge anchor. A worn, incorrect or wandering drill bit can change the hole geometry before the anchor is inserted.
Dust is removed
Concrete dust can stop the anchor from reaching full depth, interfere with the expansion zone and produce misleading torque feedback. Cleaning is an installation step, not cosmetic finishing.
The anchor passes through the fixture
The nut is kept on the thread to protect the end while the anchor is driven to the required position. The washer bears against the fixture and helps distribute clamping force.
Torque activates the clip
As the nut is tightened, the stud rises relative to the clip. The tapered section pushes the clip against sound concrete. Correct torque is needed to set the system without damaging it.
Base-material rule: a conventional wedge anchor is intended for dense, solid concrete unless the exact product documentation says otherwise. Brick, hollow block, aerated concrete, cracked concrete and stone are not automatically acceptable substitutes. Each has different failure behaviour and may require a sleeve anchor, chemical anchoring system, frame fixing or another approved solution.
The load can act in tension, trying to pull the anchor out; in shear, trying to slide the fixture across the surface; or as a combination of both. Concrete strength and condition, embedment, anchor spacing, distance from an edge, fixture stiffness and installation quality all influence capacity. A catalogue value from a different brand or configuration must not be transferred to an untested anchor simply because the diameter looks the same.
This distinction is important for procurement. “Wedge anchor,” “through bolt,” “expansion stud” and “concrete anchor bolt” may be used loosely in enquiries, but the received part should still be checked by drawing, dimensions, material, finish and application. If the project may need a different anchoring principle, compare the heavy-duty anchor range before finalising the purchase order.
Wedge anchor sizes, materials and finishes available for enquiry
Shree OSR Enterprises offers wedge anchors in multiple metric diameters, lengths and corrosion-protection options. The current product range identifies M6 to M24 diameters and lengths from 50 mm to 300 mm, while the main product specification highlights M8 to M24 and a minimum order quantity of 100 pieces. Exact combinations are subject to stock, production feasibility and confirmation at quotation stage.
A size such as “M12 × 150” usually communicates nominal thread diameter and overall length, but it does not fully define a performance specification. A buyer should also state the steel material or property requirement, coating, thread pitch where non-standard, required embedment, fixture thickness, washer and nut requirement, quantity, packing and any test or traceability documents.
Common diameter logic
Smaller diameters are frequently considered for lighter fixtures and compact brackets; middle sizes appear across frames, supports, handrails and equipment bases; larger sizes are evaluated for heavier connections. This is only a procurement pattern—not a load table. The responsible designer must calculate or approve the exact size using product-specific data.
- M6 and M8: compact fixtures where edge conditions and drilling accuracy can be especially important.
- M10 and M12: widely requested general construction and industrial fastening sizes.
- M16 and M20: commonly considered for heavier brackets, frames and machinery bases.
- M24: a large-diameter option for engineered applications with adequate concrete thickness and spacing.
Never upgrade diameter on site without checking the fixture hole, concrete member, required edge distance and design calculations. A bigger expansion anchor exerts greater forces on the surrounding concrete and needs corresponding space.
| Enquiry size | Typical buying description | Information still required | Availability note |
|---|---|---|---|
| M6 | Small-diameter metric wedge anchor | Length, material, finish, quantity and application | Listed in the technical range; confirm exact combination |
| M8 | M8 wedge anchor for concrete | Fixture thickness, embedment and environment | Part of the main M8–M24 enquiry range |
| M10 | M10 expansion anchor bolt | Overall length, steel option and documentation | Standard and project quantities can be discussed |
| M12 | M12 wedge anchor with nut and washer | Concrete condition, load direction and finish | Multiple lengths subject to confirmation |
| M16 | Heavy-duty M16 concrete wedge anchor | Approved performance, spacing, edges and torque | Engineering acceptance required for critical work |
| M20 | M20 MS, HDG or stainless wedge anchor | Material grade, exposure, length and testing needs | Confirm project schedule and pack quantity |
| M24 | Large-diameter M24 wedge anchor | Concrete thickness, embedment, loads and approvals | Project-specific technical review is recommended |
How to ask for wedge anchor price: send one line per item—for example, product type, diameter × length, material/grade, finish, quantity and delivery city. Add required certificates, inspection and packing instructions. This produces a more meaningful bulk price than asking for a rate “per piece” without the specification.
Price can change with diameter, length, raw material, stainless grade, coating process, quantity, packaging, testing, custom manufacturing and freight. For an exact offer, use the Shree OSR enquiry page and attach the relevant schedule or drawing.
MS, zinc plated, HDG, SS304 or SS316?
Material and finish answer different questions. The base steel influences mechanical properties and corrosion behaviour; a coating adds surface protection; a stainless grade provides corrosion resistance through its alloy composition. Select the complete combination for the environment and the approved structural requirement.
Mild steel
Economical base optionConsider for dry, protected indoor service or other applications where the specified protective finish and maintenance plan are suitable. Bare mild steel should not be treated as corrosion resistant.
Zinc plated
General indoor protectionA relatively thin zinc coating provides a clean finish and improved resistance compared with bare steel. It is commonly evaluated for indoor or sheltered use, not severe exposure by default.
Hot-dip galvanized
Outdoor project optionA heavier zinc coating is often selected for outdoor steelwork and infrastructure. Confirm coating requirements, compatible nut fit and any constraints for the steel grade and application.
SS304
Broad corrosion resistanceOften considered for architectural, hygienic, humid and general outdoor locations. It is not automatically the correct stainless choice where chlorides, marine exposure or aggressive chemicals dominate.
SS316
Chloride-facing optionFrequently specified for coastal, marine, wash-down and more demanding chemical environments. Suitability still depends on concentration, temperature, crevices, maintenance and the complete assembly.
Do not mix materials casually
The stud, nut and washer should form a compatible assembly. Mixing stainless and carbon-steel components can produce uneven durability and may introduce galvanic-corrosion concerns when moisture is present. Coating thickness can also affect thread fit, so the nut should be supplied or verified for the finished stud rather than chosen independently at the last moment.
Exposure is not limited to “indoor” or “outdoor.” Ask whether the anchor is near a coast, exposed to monsoon water, buried under a leaking base plate, cleaned with chemicals, installed in a food or pharmaceutical facility, exposed to high temperature, or hidden where future inspection is difficult. Water trapped at the fixture interface can create a more aggressive local environment than the surrounding room suggests.
Also separate corrosion grade from strength grade. “Stainless steel” is not a universal strength class, and “heat treated” is not a corrosion finish. Where mechanical properties are controlled, state the required grade or approved product designation instead of relying on material name alone.
A practical finish-selection conversation
- Dry indoor: discuss mild steel or zinc-plated steel, subject to the project specification.
- Sheltered outdoor: review moisture, maintenance and expected life before choosing zinc plating.
- Exposed outdoor: evaluate HDG or an appropriate stainless grade.
- Coastal or chloride exposure: assess SS316 and the full environmental conditions.
- Chemical or hygienic service: confirm chemical compatibility, cleanability and documentation.
- High-load or safety-critical: mechanical performance and approved anchor data remain mandatory, regardless of finish.
For a fuller explanation of the distinctions, read MS vs HDG vs stainless steel vs heat-treated fasteners. Use that material guide together with the engineer’s anchor schedule, not as a replacement for it.
A wedge anchor size worksheet for engineers and buyers
Product searches often begin with M8, M10, M12, M16, M20 or M24. Good specification begins one step earlier: define the joint and let the approved design establish the diameter, embedment and number of anchors. Use the following questions to collect the information your engineer, installer and supplier need.
What is the base material?
Confirm solid concrete, concrete strength, age, thickness and whether cracked-concrete or seismic performance is required. Do not assume a wedge anchor is suitable for brick, hollow block or AAC.
Which forces act on it?
Identify tension, shear, combined load, moment, impact, vibration, cyclic action and load duration. The consequence of failure influences the required design and approval level.
How thick is the fixture?
Measure the base plate or bracket plus packers, grout gaps or shims. The anchor must pass through the complete fixture and still provide the specified embedment and thread engagement.
Where are edges and neighbours?
Record anchor-to-edge distance, spacing between anchors and proximity to joints, openings or reinforcement. Closely grouped anchors and nearby edges can reduce concrete resistance.
What is the environment?
State indoor, outdoor, coastal, submerged, humid, chemical, temperature and wash-down conditions. Material and finish should cover the intended service life and inspection access.
How will it be installed?
Check drill access, bit type, hole cleaning, installation orientation, calibrated torque tools, installer competency and the ability to inspect the completed connection.
This relationship is a specification check, not a universal sizing formula. Overall length conventions, washer thickness, nut dimensions, usable thread length and embedment definitions can differ. Confirm the selected catalogue item before drilling.
Embedment is especially important. Too little can reduce resistance; drilling too deep or selecting an unnecessarily long anchor does not automatically increase capacity and may conflict with member thickness, reinforcement or services. Hole diameter is normally matched to the anchor system, but the exact bit and drilling tolerance must come from its installation instructions. Do not take a drill chart for one manufacturer and apply it to another unverified product.
For repeated anchor groups, prepare a schedule listing mark number, location, quantity, diameter, length, material/finish, concrete details and installation reference. This gives procurement, site supervision and quality control one controlled source instead of several informal messages.
Where wedge anchor bolts are commonly evaluated
Wedge anchors are best understood by the connection they secure. The examples below describe common use cases, but each still needs an approved size, embedment, spacing, material and installation plan.
Structural steel and fabricated frames
Base plates, support frames, stairs, ladders, platforms, light steelwork and secondary structural connections often need permanent anchoring to an existing concrete member. Wedge anchors allow through-fixing, which can simplify alignment when the fixture holes and drilled holes are coordinated.
- Check plate-hole size and washer bearing.
- Account for moments and prying, not only direct vertical load.
- Confirm grout gaps, levelling nuts or packers in the overall length.
- Have the responsible engineer review critical structural connections.
Machinery and equipment bases
Pumps, compressors, production equipment, frames and utility skids can impose vibration, start-stop forces or maintenance loads. Anchor selection should be coordinated with the equipment manufacturer, base-plate design, grout and concrete foundation.
- Define static, dynamic and accidental actions.
- Use approved tightening and commissioning procedures.
- Plan inspection where vibration may affect the joint.
MEP supports and services
Pipe-support frames, cable-tray supports, duct brackets, HVAC bases and service platforms may use concrete anchors. Overhead work deserves particular care because a detached support can endanger people and connected services.
- Review fire, vibration and overhead-load requirements.
- Locate reinforcement and concealed services before drilling.
- Use only the specified, approved anchor configuration.
Building, warehouse and public-area fixtures
Handrail posts, guardrails, barriers, storage-rack frames, gates, canopies and protective bollard plates can appear simple but may be exposed to impact, crowd loading, forklift movement or close concrete edges. A connection must be designed for how the fixture is actually used, not only for its self-weight.
- Guardrails and barriers can attract significant moment at the base.
- Rack anchors should follow the rack supplier’s layout and tolerances.
- Outdoor fixtures need a durable material and drainage-friendly detail.
- Public-access and fall-protection connections require controlled installation and inspection.
Solar, façade and exterior supports
Mounting frames and exterior brackets face wind, temperature changes and rain. Coastal projects add chloride exposure. The engineer should confirm the anchor’s approved suitability, while the buyer specifies the required finish or stainless grade for the service environment. Water should not be allowed to remain trapped around the base plate and exposed thread.
When a wedge anchor may not be the right choice
Consider another system when the base is hollow or weak, edge distances are tight, adjustability or removal is required, the hole cannot be drilled accurately, reinforcement conflicts are likely, or the specification requires a qualified solution for cracked concrete or seismic demand. Read chemical anchor vs mechanical anchor for the main decision factors.
Wedge anchor procurement checklist for bulk and project orders
A complete enquiry allows technical and commercial review to happen before material reaches site. It also reduces the risk of mixed grades, unsuitable finishes, wrong lengths or undocumented substitutions inside a single delivery.
Identify the product
State wedge anchor or the approved product designation; metric diameter; overall length; thread pitch if special; stud, nut and washer configuration; and whether a sample, drawing or reference specification controls the dimensions.
Define material and finish
Specify MS or stainless grade, required steel property where applicable, zinc-plated or HDG finish, and any coating requirement. Describe the service environment so an obvious mismatch can be flagged before quotation.
State project conditions
Include concrete condition, intended application, fixture thickness, load/design reference, installation location and delivery city. For controlled construction, attach the approved anchor schedule instead of retyping it from memory.
Set the quantity
Provide quantity per size, required spares, lot split, delivery sequence and target date. The current product listing notes a 100-piece MOQ; confirm the applicable quantity for each size and custom combination.
List documents
Request only the inspection, material, coating, test, compliance or traceability documents the project actually needs, and agree on their format before order. Do not assume every commercial product carries every approval.
Control identification
Define labels by product, diameter, length, material, finish, quantity and lot where traceability applies. Separate visually similar carbon-steel and stainless items so site teams cannot select them from an unmarked mixed bin.
Protect during transport
Agree on cartons, inner packs, moisture protection and palletisation for the route and site storage period. Threads, expansion clips and protective finishes should arrive free from deformation, heavy corrosion and contamination.
Approve changes formally
If the ordered length or finish is unavailable, review the alternative against engineering and exposure requirements. A purchasing substitution is not approved merely because it fits the fixture hole or costs less.
Incoming inspection at site or stores
- Match delivery note, purchase order and approved schedule.
- Count and segregate each diameter, length, material and finish.
- Inspect threads, nuts, washers and expansion clips for damage.
- Look for corrosion, coating loss, contamination or wet packaging.
- Check identification and requested document references.
- Quarantine mixed, unmarked or non-conforming items.
- Keep accepted anchors dry, separated and protected until issue.
A quick dimensional spot check should use suitable measuring tools and the controlled drawing or specification. Colour and appearance alone cannot confirm stainless grade, coating thickness, steel strength or certified performance.
What Shree OSR Enterprises needs from your team
Send a structured requirement rather than a photograph alone. A photo can help identify the anchor family, but it cannot confirm diameter, total length, thread, steel grade or required performance. For replacement work, provide measured dimensions, markings, base material, fixture details and the reason the existing anchor is being replaced.
Shree OSR Enterprises supplies anchors and related industrial fasteners for contractors, fabricators, maintenance teams, distributors and project buyers. Availability, manufacturing route, custom size, documentation, packing, price and delivery are confirmed against the submitted requirement. Browse the complete industrial product range when the order also includes bolts, nuts, washers, threaded rods, clamps or supporting hardware.
For engineered anchoring, purchasing and engineering should close the specification together. The supplier can quote what is requested; the responsible designer must decide what the connection requires.
Copy this enquiry format: Wedge anchor | size ___ × ___ mm | material/grade ___ | finish ___ | quantity ___ pieces | fixture thickness ___ mm | application ___ | concrete/site condition ___ | required documents ___ | packaging ___ | delivery city and date ___.
Continue your anchor and fastener research
A product page should help a buyer move to the next relevant decision instead of repeating generic claims. Use these guides and categories to compare anchoring principles, material options and related construction hardware. Each link stays within the Shree OSR Enterprises website and connects this product to a broader topical cluster.
Browse heavy-duty anchors
Compare mechanical, chemical, sleeve, projection, hook and related anchor families listed in one category.
Selection guideChemical vs mechanical anchors
Understand expansion force, resin bonding, cure time, concrete condition and installation trade-offs.
Technical comparisonWedge vs drop-in anchors
Compare a projecting male stud with a flush, internally threaded anchor point for removable bolts.
Material guideMS, HDG, stainless and HT
Separate base material, protective finish and strength-related processing before specifying an order.
Buyer guideChoose industrial fasteners
Work from joint conditions, loads and environment to dimensions, grade, documentation and inspection.
Learning centreIndustrial fastener fundamentals
Review major fastener families, terminology, materials and procurement information for new buyers.
Send a complete wedge anchor requirement
Share diameter, length, material or grade, finish, quantity, fixture and concrete details, required documents, delivery location and schedule. The team can then review availability and prepare a requirement-focused quotation.
Wedge anchor buying and installation FAQs
Short answers to the questions most often raised by contractors, industrial buyers and procurement teams.
What is a wedge anchor used for?
A wedge anchor is used to create a permanent mechanical connection between a fixture and suitable solid concrete. Common examples include steel base plates, machinery frames, handrail posts, guardrails, pipe-support frames, cable-tray supports, warehouse fixtures and exterior brackets. Tightening the nut activates an expansion clip near the embedded end of the stud. The exact application must fall within the approved product data, concrete conditions and engineering design. A wedge anchor should not be assumed suitable for hollow block, brick, AAC, deteriorated concrete or stone simply because a hole can be drilled in that material.
Which wedge anchor sizes does Shree OSR Enterprises offer?
The product information lists metric diameters from M6 to M24 and lengths from 50 mm to 300 mm, while the main specification highlights M8 to M24 as the core range. Exact diameter-and-length combinations, material options and quantities must be confirmed when quoting. Send the required size in diameter × length format, along with material or grade, finish, quantity and delivery city. If a drawing or anchor schedule controls the order, attach it so the offered product can be checked against the full requirement rather than against nominal diameter alone.
How do I choose between M8, M10, M12, M16, M20 and M24?
Do not choose only by the apparent weight of the fixture. Diameter and number of anchors depend on tension, shear, combined load, moment, vibration, concrete strength and condition, embedment, fixture geometry, member thickness, edges and spacing. Environmental exposure also determines the required material or finish. An engineer should select the size using current, product-specific resistance data for the exact anchor and concrete condition. Procurement can then use that approved size to confirm length, steel option, nut and washer configuration, quantity, documentation and delivery.
What length of wedge anchor do I need?
Overall anchor length must accommodate the complete fixture thickness, any approved packer or grout allowance, washer and nut engagement, plus the required effective embedment in concrete. The anchor’s thread length and manufacturer’s dimensional convention also matter. Measure the actual plate or bracket rather than relying on a nominal drawing thickness when coatings, shims or levelling arrangements are present. Confirm the final catalogue item before drilling. Choosing extra length without checking member thickness, reinforcement and approved embedment does not automatically provide more load capacity.
What drill-bit size should be used for a wedge anchor?
Use the drill-bit diameter and drilling method stated in the installation data for the exact approved wedge anchor. Many wedge systems use a nominal hole related to the anchor diameter, but tolerances, bit type, concrete condition and product geometry can differ. Do not copy a generic online drill chart into a structural method statement without verifying it against the supplied anchor. Inspect the bit for wear, drill perpendicular without rocking, control depth and clean the hole by the specified process before insertion.
Can wedge anchors be installed in brick or concrete block?
A conventional wedge anchor is primarily intended for sound, solid concrete unless its exact technical documentation expressly approves another base material. Brick can split, hollow block may not provide a continuous expansion zone, and lightweight block has very different resistance. Sleeve anchors, frame fixings, chemical systems with suitable sleeves, or other masonry-specific anchors may be more appropriate, but their selection still depends on the unit type, voids, joint location and load. Review the anchor product category and obtain engineering approval before substituting.
Is SS316 always better than SS304 or HDG?
No material is “best” in every project. SS316 is often preferred in coastal, chloride-bearing, marine, wash-down or more aggressive environments. SS304 offers broad corrosion resistance for many architectural and general outdoor settings. HDG carbon steel can be a practical outdoor structural choice where the project permits it, while zinc-plated steel is more commonly considered for indoor or sheltered service. Mechanical properties, approved anchor performance, cost, availability, contact with other metals and required service life must be considered together. State the environment and specification when requesting a quote.
Can a wedge anchor be removed and reused?
A wedge anchor creates a permanent expansion fixing and should not be reused after setting, removal or damage. The nut and fixture may sometimes be removable, but the embedded stud usually remains and its expansion mechanism has already been activated. Do not hammer a used anchor into another hole or straighten damaged threads. Where equipment must be removed repeatedly, an internally threaded anchor or another approved connection may be more suitable. Any abandoned or rejected anchor location should be handled through an engineer-approved repair and spacing plan.
What is the difference between a wedge anchor and a chemical anchor?
A wedge anchor develops grip by mechanically expanding against the concrete as its nut is tightened. A chemical anchor bonds a threaded rod or reinforcing bar into a prepared hole using resin. Wedge anchors offer quick setting without resin cure time, while qualified chemical systems can support different embedments and avoid expansion during installation. Chemical anchors demand strict hole cleaning, correct resin, temperature control and full cure before loading. The right choice depends on concrete condition, edges, spacing, loads, installation conditions and approvals. See the detailed chemical vs mechanical anchor guide.
How much does a wedge anchor cost in India?
Wedge anchor price depends on diameter, overall length, base material, steel grade, zinc-plated or HDG finish, SS304 or SS316 selection, order quantity, packaging, testing, documentation, custom manufacturing and delivery. A single rate without these details can compare unlike products. For accurate bulk pricing, send one line per item with size, material or grade, finish, quantity and delivery location. Add the project schedule, documentation needs and required delivery date so the quotation covers the complete supply rather than only a nominal price per piece.
What should I send when requesting a bulk quotation?
Send product name, diameter × total length, material or grade, finish, quantity for each size, required nut and washer, application, fixture thickness, relevant concrete or site information, delivery city and target date. State packaging, material certificates, coating reports, inspection or traceability requirements before the order. For custom items, attach a controlled drawing with revision. A photograph is useful for identification but does not replace measured dimensions and specification. You can submit these details through the contact and enquiry page.
Does this page provide a load-capacity or installation-torque chart?
No generic load or torque chart is given because values are not safely interchangeable between different products, diameters, embedments, concrete strengths, edge distances, spacings and cracked or uncracked conditions. Installation torque is also specific to the anchor design and configuration. Use only approved technical data for the exact supplied anchor and the current project design. For structural, overhead, seismic, façade, barrier or other safety-critical connections, have a qualified engineer approve the anchor system, method statement, inspection and any required proof-testing plan.
Technical note: This content provides general selection, procurement and installation guidance. It does not replace project drawings, structural calculations, applicable codes, product approvals, manufacturer instructions, site testing or advice from the responsible qualified engineer.