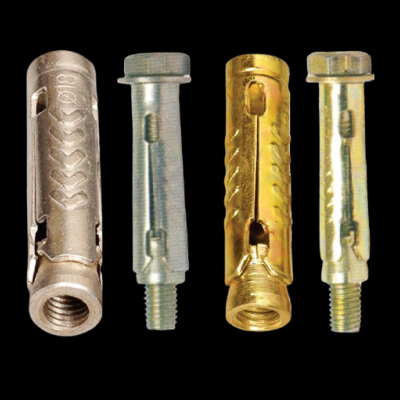
Stainless Steel SS TAM ANCHOR
| Material | Stainless Steel |
|---|---|
| Usage/Application | Industrial |
| Surface Finishing | Polished |
| Standard | ISO |
| Material Grade | Stainless Steel |
| Country of Origin | Made in India |
| Application | Industrial |
Stainless steel TAM anchors for defined concrete, masonry and stone fixing requirements
A TAM anchor is part of the mechanical expansion-anchor family. Its metal body is placed in a correctly prepared hole and activated by the compatible bolt or internal mechanism so the expansion zones engage the surrounding base material. The result can be a compact, practical fixing point—but only when the anchor configuration, substrate, load, geometry and installation procedure belong together.
Shree OSR Enterprises’ current listing identifies a stainless steel TAM anchor for industrial use, with polished finish, ISO standard reference and Indian origin. It mentions concrete, brick and stone and notes that stainless-steel or carbon-steel configurations may be available. Material grade, thread, length, bolt arrangement, drilling, embedment, fixture thickness, resistance and tightening instruction must be confirmed for the exact item quoted.
“TAM anchor” covers related shield-style designs that are not always interchangeable. Some use an internally threaded body and separate bolt; others are assembled anchor bolts. Send the drawing, required configuration or a sample reference for replacement work.
For a broad catalogue view, browse all Shree OSR industrial products. For this enquiry, use the product summary below to convert “send TAM anchor price” into a quotation that can be checked before purchase.
What a TAM anchor does inside the drilled hole
The familiar metal shell is only one part of the connection. Resistance develops through interaction between the anchor, the drilled-hole wall, the base material and the fixture. Understanding that load path helps a buyer ask the right questions and helps an installer avoid treating all expansion anchors as the same product.
Expansion body or shield
The slotted or segmented metal body enters the drilled hole. When the system is activated, portions of this body move outward. Its geometry, material and manufacturing tolerances influence how expansion is distributed. The exact body form can differ between TAM anchor ranges, so use the quoted drawing rather than a generic online image.
Cone, wedge or expander
An internal tapered element converts axial movement into outward expansion. Depending on the design, tightening the bolt pulls components together or another prescribed setting action drives the expander. Follow the data for the supplied product; an installation method borrowed from a visually similar anchor can leave it under-set or damaged.
Internal thread and bolt
Many shield-style TAM anchors provide a female thread for a compatible bolt, while some commercial packages show an assembled bolt. Thread diameter, pitch, engagement, bolt length, property class or stainless grade and head form must all match. A bolt that starts in the thread is not automatically an approved component.
Fixture and bearing parts
The bracket, plate, rail or equipment foot transfers force to the anchor through the bolt, head, nut and washer. Fixture-hole size, plate thickness, surface flatness and washer bearing affect the joint. A strong anchor cannot compensate for a thin, torn, distorted or incorrectly positioned fixture.
The correct bolt is tightened or the specified setting step is completed using the product instructions.
The expander moves relative to the body and creates controlled contact with the prepared base material.
Tension and shear pass through the fixture, bolt, anchor body and substrate according to the connection design.
The TAM anchor specification fields buyers should not leave blank
The current product listing supplies several commercial attributes, while the fields that control fit and anchoring performance remain order-specific. This matrix separates what is currently stated from what must be confirmed on the quotation, approved submittal or manufacturer data.
| Specification field | Current page position | What to state in the enquiry | Why it changes the result |
|---|---|---|---|
| Product family and configuration | Known Stainless Steel SS TAM Anchor. | State whether you require an expansion body only, body with bolt, complete assembled anchor, particular head style or matching an approved sample. | Commercial TAM designs can differ in body form, activation method and supplied components. The same trade name does not guarantee a drop-in replacement. |
| Material and grade | Known in part Stainless steel is listed; page copy also mentions stainless or carbon steel. | Write the exact stainless grade or carbon-steel grade/finish required. Add the certificate level and any project corrosion specification. | Grade affects corrosion behaviour, strength, fabrication, magnetic response and cost. “SS” alone is incomplete. |
| Surface condition | Known in part Polished is listed. | Confirm whether polished, passivated, plated, coated or another condition is required and which visible or concealed components it covers. | Appearance is not proof of alloy or protection. Finishing must remain compatible with the environment and all mating parts. |
| Thread | Confirm | Specify nominal diameter, pitch and thread standard; include engagement or bolt length if the bolt is separate. | A diameter label without pitch can produce a bolt that binds, strips or achieves insufficient engagement. |
| Anchor and bolt dimensions | Confirm | Provide anchor-body diameter and length, bolt length, head form, washer and nut dimensions, fixture thickness and any tolerance requirement. | Dimensions determine fit, embedment, fixture allowance, tool access and whether the expansion zone reaches sound material. |
| Base material | Broadly stated Concrete, brick and stone are mentioned. | Identify concrete strength and cracked condition, brick or block type and solidity, mortar condition, or stone type, thickness and integrity. | Concrete, brick, block and natural stone do not provide one common resistance. Approval for one base does not transfer automatically to another. |
| Drilling and setting data | Confirm | Request drill-bit diameter, minimum hole depth, hole-cleaning steps, insertion method, setting tool if any, tightening torque and inspection criteria. | The hole and setting action create the anchor’s engagement. Incorrect diameter, dust, shallow drilling or arbitrary torque can impair it. |
| Design geometry | Confirm | Record effective embedment, minimum member thickness, edge distance, anchor spacing, fixture-hole diameter and group layout. | Expansion forces and load cones can interact with edges, reinforcement, joints and nearby anchors. Geometry is part of capacity. |
| Resistance and suitability | Project data | Ask for applicable test/approval data and have the responsible designer check tension, shear, combined action, service condition and failure consequences. | Unrelated catalogue values, competitor data or “heavy duty” language cannot be assigned to this exact product. |
| Commercial and quality terms | Order-specific | Quantity, sample approval, inspection, traceability, packing, marking, delivery location, required date and price basis. | A technically suitable anchor can still cause delay if documentation, batch identification or packing does not match the project workflow. |
Select stainless steel by exposure, mating parts and required service life
The live page names stainless steel and a polished finish, but neither phrase establishes a complete durability specification. Stainless grades perform differently, polishing is not a substitute for grade confirmation, and the connection may contain a bolt, washer, nut, bracket or insert made from another material.
Start with the real environment
Classify the fixing as dry interior, humid, sheltered, exposed, industrial, coastal, marine, wash-down or chemically affected. Moisture can remain in a crevice after the visible bolt head dries. Chlorides, polluted condensation and cleaning chemicals may change the corrosion decision.
- Record the intended service life and inspection access.
- Identify water paths and trapped-moisture risks.
- Include fire, temperature or hygiene requirements where relevant.
- Ask the designer to define the accepted alloy and protection system.
Keep every component compatible
A stainless body paired with an unsuitable carbon-steel bolt may be limited by that bolt. Dissimilar metals can create galvanic concerns in moisture. Review the body, expander, bolt, nut, washer, fixture and isolation as one assembly. Confirm stainless-bolt grade, property class, thread and installation requirements.
- Do not identify material by colour alone.
- Control contamination from carbon-steel tools or racks.
- Keep certificates linked to batches if traceability is required.
- Confirm whether replacement bolts must come from the approved system.
Separate alloy, strength and finish
Alloy grade describes chemical composition; fastener property or strength class relates to mechanical performance; finish describes surface condition or applied protection. These fields interact but are not interchangeable. “SS 304 polished” still does not state thread dimensions, bolt strength, anchor resistance or suitability for a specific coastal project. Likewise, changing to another stainless grade is a design and procurement decision, not an automatic upgrade.
- Put the exact requested grade on the RFQ and purchase order.
- Define the standard or project clause behind the grade.
- Specify documents such as MTCs only when needed and confirm availability.
- Do not mix approved and unapproved batches during site issue.
Stainless-steel threads need controlled installation
Stainless mating threads can gall when unsuitable components, contamination, excessive speed or uncontrolled tightening are involved. Use the approved bolt, lubrication condition and torque instruction for the anchor system. Never add a lubricant casually: it can materially change the relationship between applied torque and bolt tension. Hilti’s official anchor fastening technical guides illustrate why design and installation need identified product data; Shree OSR’s product-specific information must govern this TAM anchor.
Use material content to support—not replace—the specification
Shree OSR’s guide to MS, HDG, stainless and heat-treated fasteners helps procurement teams understand common material routes. For the actual order, the project specification and approved submittal remain decisive. Ask whether the requested finish applies to every component, how cut or formed surfaces are handled, and how items will be marked so receiving staff can identify them.
Concrete, brick and stone require different evidence—not one generic anchor promise
The product description mentions three broad base-material families. Each family contains conditions that can change expansion behaviour and failure mode. Before specifying a stainless steel TAM anchor, identify what is actually behind the fixture and whether the exact product has supporting data for that condition.
Concrete
Record compressive-strength class where known, member thickness, age, cracked or uncracked design condition, reinforcement location, joints, edges and surface condition. A hole drilled into sound concrete is not equivalent to one crossing a crack, honeycomb, repair mortar, void or construction joint. Scan before drilling where reinforcement or embedded services are at risk.
- Confirm whether the anchor has data for cracked concrete if the design requires it.
- Check edge distance, spacing and member thickness as a group.
- Use product-specific drill and setting instructions.
- Do not approve structural work from an informal site pull alone.
Solid brick and masonry
Identify unit type, density, strength, dimensions, age and mortar condition. Decide whether the hole is permitted in the unit or mortar joint. Brittle, weathered or weak masonry may split under expansion, especially near free edges. A statement that an anchor is “for brick” does not cover every clay brick, calcium-silicate unit or concrete masonry product.
- Use the tested substrate and installation position in the technical data.
- Consider variability across old walls and repaired areas.
- Avoid assuming values from concrete apply to masonry.
- Seek engineering review for façade, overhead and public-safety connections.
Hollow or perforated units
A conventional expansion body may enter a void, bridge a thin web or generate local stress the unit cannot support. Unless the exact TAM configuration is approved for the identified hollow unit, treat suitability as unconfirmed. A screen tube and resin, specialised hollow-wall anchor, frame fixing or other system may be more appropriate, but substitution requires design and test data.
- Identify web thickness and hole location before choosing the mechanism.
- Do not rely on the overall block size alone.
- Check whether drilling mode can damage the unit.
- Use a trial or project test only under an approved procedure.
Natural stone
Stone type, thickness, bedding, veining, existing cracks, edge distance, orientation and weathering all matter. Expansion inside dimension stone can cause splitting or spalling if the detail is unsuitable. “For stone” should therefore lead to a project-specific assessment, not a blanket claim for marble, granite, sandstone and limestone in every thickness.
- Distinguish fixing into a structural stone substrate from fixing a thin cladding panel.
- Keep drilled holes away from weak veins and damaged edges as designed.
- Use the façade or stone engineer’s approved connection.
- For cladding hardware, review the separate stone fixing anchor range.
Where a TAM anchor may enter the specification conversation
These examples help buyers describe the intended joint. They are not approvals for a load, substrate or risk category. The final anchor must be selected from verified data for the exact condition.
Industrial brackets, rails and service supports
Mechanical expansion anchors are often considered for brackets, light frames, cable or pipe supports, guards and rails on a suitable mineral base. TAM anchors can offer a compact arrangement where the approved design calls for their configuration.
Review the full assembly. Bracket thickness affects bearing; slots introduce eccentricity; stand-off creates bending; anchors may not share load equally; and vibration can change the requirement.
- Provide the bracket drawing and hole pattern.
- Identify tension, shear, moment and dynamic actions.
- State whether the fixture will be removed.
- Confirm inspection access.
- Coordinate channels, clamps and supporting steel.
The slotted C channel range may help complete an adjustable support bill of materials; it is not part of the anchor approval unless designed as a system.
Handrails, barriers and fabricated frames
Base plates and wall brackets for rails, gates or protective frames can impose tension, shear and prying on the anchors. Public-safety applications need engineered resistance, adequate edge distance, robust fixture plates and inspection—not selection from a generic “medium duty” label.
Equipment and machine accessories
Guards, small equipment frames and service accessories may use mechanical anchors when the substrate and loading permit. Record vibration, impact, cyclic action, alignment, grout layer and maintenance removal. Precision equipment may also require a different anchor or levelling strategy.
Building-services installations
HVAC, electrical and plumbing contractors may encounter TAM or shield anchors for brackets and support points. Fire-rated, seismic, overhead or life-safety services require the specific tested/approved system and design documentation; a general product page cannot establish that suitability.
Repair and retrofit work
A TAM anchor may be proposed when replacing an old shield-style fixing, but existing holes are often worn, contaminated or poorly documented. Survey the base, compare full dimensions and obtain an approved repair detail. A new anchor should not be forced into an unknown legacy hole.
How to select a TAM anchor without starting from diameter alone
A nominal thread such as M8 or M10 may be the first field mentioned in a purchase request, but it is not the first engineering decision. Start at the connection and work inward. This sequence exposes missing information before a price comparison turns into an unsuitable order.
Define what is being attached
Provide a drawing or describe the bracket, base plate, rail, frame, equipment foot or accessory. State material, thickness, hole diameter, slots, stand-off, grout, washers and whether the item must be removable. Identify installation access: can a standard socket and calibrated torque wrench reach the bolt squarely, or is the joint recessed behind another component?
Why first: the fixture controls bolt length, bearing, eccentricity and installation sequence. An anchor selected without it may be too short, leave inadequate thread engagement or place the expansion body in the wrong zone.
Identify loads and consequence of failure
Separate tension, shear, combined action, bending or prying, sustained load, vibration, impact, thermal movement and cyclic action. Record whether failure would create only minor service disruption or could injure people, damage critical equipment or cause progressive collapse. A conservative-looking diameter is not a substitute for calculated actions and appropriate safety factors.
Design boundary: the responsible engineer selects resistance data, design method and acceptance criteria. Sales descriptions such as reliable, strong or heavy duty are not characteristic or allowable loads.
Survey the exact base material
Confirm concrete, solid brick, masonry, structural stone or another substrate; then describe its strength, condition, thickness, cracked state, voids, joints, edges and reinforcement. In retrofit work, plans may be inaccurate. Use approved scanning, opening-up or testing to resolve uncertainty before releasing the anchor schedule.
Check available geometry
Map the required embedment against member thickness. Mark distances to free edges, joints, openings, nearby anchors and reinforcement. Review whether multiple expansion zones or concrete breakout regions interact. If the approved geometry cannot be achieved, return the detail to the designer rather than reducing embedment, moving holes or selecting a narrower item at site.
Choose the anchoring principle
Decide whether the connection benefits from a TAM or shield-style expansion anchor, a stud-type wedge anchor, a full-sleeve configuration, a flush female insert or a bonded anchor. Base-material approval, edge effects, required removability, installation access, cure-time constraints and inspection method matter more than familiarity with one product.
Match material to exposure
Specify stainless grade or protected carbon steel for the full assembly. Review wet holes, crevices, chlorides, industrial pollutants, cleaning chemicals and dissimilar-metal contact. If the fixing is concealed, decide how condition will be inspected over its service life. A polished appearance at delivery does not predict long-term durability in an unassessed environment.
Obtain product-specific dimensions and performance evidence
Ask Shree OSR for the available configuration and order data. For structural selection, use test or approval information applicable to the exact anchor, size, material, base, embedment and installation. Confirm the supplied bolt and setting procedure. Do not assemble a performance claim from a TAM body sold by one source, a bolt from another source and a load table found on a third website.
Freeze the submittal and site control plan
Approve the product code, drawing, material, dimensions, setting instruction, torque, certificates, sample, labelling and inspection steps before dispatch. Brief installers and receiving staff. Define what constitutes a nonconformance and who can authorise a repair or substitution. Preserve batch identity where required so the installed anchors can be tied back to delivery records.
Verify delivery
Check product code, size, material, finish, anchor body, bolt, nut, washer, quantity, batch marks and documents against the approved submittal. Quarantine mixed, corroded, damaged or unidentified components. Make sure the bolt supplied is the one evaluated with the body rather than a visually similar site-stock bolt.
Confirm location
Transfer the approved set-out and verify edges, joints, reinforcement, services and hidden cavities. Compare the actual bracket hole pattern with the drawing. Where scanning is specified, record it. Do not move an anchor to avoid reinforcement unless the designer accepts the revised load path and spacing.
Select calibrated tools
Use the prescribed drill type, bit diameter, depth control, hole-cleaning tools, insertion equipment, setting tool and calibrated torque wrench. Check bit wear. A nominally correct but worn, bent or wrong-tolerance bit can produce a hole outside the acceptable range.
Drill squarely to depth
Drill at the required angle without enlarging the entrance by rocking the tool. Respect the specified drilling mode for the substrate. Mark or control depth so dust allowance and effective embedment are achieved. If the bit enters a void or the drilling response changes unexpectedly, stop and inspect.
Clean exactly as specified
Remove dust using the stated blowing and brushing sequence or other approved method. Dust can reduce contact, prevent full insertion and interfere with setting. Wear appropriate PPE and control silica exposure. Do not assume that an apparently empty hole is clean at its full depth.
Insert without modification
Position the anchor at the required depth and orientation using the specified insertion action. Do not grind the body, mix components, hammer the thread, remove expansion parts or force an anchor into an undersized or misaligned hole. Protect exposed threads while tapping if the instruction permits tapping.
Seat the fixture
Bring the bracket or plate into full, stable bearing. Use the approved washer arrangement and any specified packers or grout. Do not pull a distorted fixture flat by over-tightening the anchor. Gaps, slotted holes and thick coatings can change load transfer and must match the design detail.
Activate and tighten
Follow the anchor-specific sequence and apply the stated torque with a calibrated tool where torque is prescribed. Keep the tool aligned. Do not use impact tightening for final control unless explicitly allowed. If the anchor spins, the bolt binds or torque cannot be reached normally, treat it as a nonconformance.
Inspect and record
Check position, embedment indicator where available, fixture contact, washer and head seating, bolt projection, torque record, substrate damage and completed marking. Record rejected locations and approved repairs. Protect the assembly from contamination and avoid unauthorised loosening after inspection.
What an installation record may include
Location, drawing, anchor code and batch, base, drill data, cleaning, installer, calibrated tool, torque, inspection, deviations, photographs, tests, repairs and date. Define records before work starts. Rawlplug’s official three-piece shield anchor page illustrates a product-specific drill, clean, insert and torque sequence; it is not an installation sheet for this TAM anchor.
Common TAM anchor problems and the correct first response
Most site defects worsen when someone improvises. These expandable panels describe symptoms and containment actions, not repair designs. The approved project authority should decide whether a hole can be reused, enlarged, relocated, resin-filled or abandoned.
The anchor spins during tightening
The hole may be oversized, dusty or damaged; the body may be wrong for the substrate; the expansion component may not be engaging; or the bolt may be incompatible. Stop tightening. Mark the location, remove the load if safe, preserve the components and obtain an approved investigation. Do not jam wire, sheet metal, adhesive or debris around the body.
Specified torque cannot be reached
Possible causes include anchor rotation, thread damage, insufficient engagement, fixture deformation, an obstruction, wrong bolt, galling or base-material failure. Do not continue with a longer lever or impact wrench. Check component identity and tool calibration, then follow the nonconformance process.
The bolt becomes tight too early
The anchor may not be fully inserted, the bolt may bottom in the internal thread, debris may occupy the hole, thread pitch may be wrong or the fixture stack may differ from the drawing. Forcing the bolt can strip threads without correctly activating the anchor. Measure the as-built components and compare them with the approved assembly.
Concrete, brick or stone cracks near the hole
Expansion stress, small edge distance, weak material, closely spaced holes, excessive torque or drilling damage may be involved. Stop nearby installation and assess the affected region. A crack is not repaired simply by moving a replacement anchor a few millimetres; the damage and revised breakout geometry must be considered.
The fixture rocks or does not seat
Check plate flatness, grout or packers, obstructions, washer bearing, slot geometry and substrate surface. Pulling the fixture down with extra torque can bend it, preload the anchors unevenly or hide a gap. Use only the approved bedding, levelling and packing detail.
The existing hole is larger than expected
Do not assume a larger TAM body is acceptable. The new size changes drilling, embedment, edge distance, spacing, bolt and load data. Reusing a worn or unknown hole may also violate the product instruction. Document diameter, depth, condition and location for an engineered repair decision.
Components from two packs look similar
Keep them separated until product codes, size, grade and batch are confirmed. Mixing a body, cone and bolt from different systems can change the expansion sequence or thread engagement. Similar finish and nominal diameter do not establish compatibility.
Rust staining appears after installation
Investigate alloy identity, contamination, mating metals, water paths, chlorides, cleaning chemicals, crevices and damage. Surface cleaning alone may not address the source. Assess whether corrosion is cosmetic, local contamination or loss of section, and implement the project durability repair.
TAM anchor vs wedge, sleeve, Rawl, drop-in and chemical anchors
These products can appear in the same procurement list, but they create different interfaces and installation demands. The right question is not “which anchor is strongest?” It is “which documented system satisfies this connection, base material, exposure, geometry and inspection plan?”
| Anchor family | Typical configuration and setting principle | Why it may be considered | What prevents automatic substitution |
|---|---|---|---|
| SS TAM anchor | A metal shield/body with an expander and compatible internal bolt or supplied bolt arrangement. The prescribed setting action expands the body against a drilled-hole wall. | Compact mechanical fixing for selected concrete, masonry or stone conditions when the exact design is supported. A female-body arrangement can suit fixtures that use a separate bolt. | TAM is a trade description used across related configurations. Confirm body, thread, bolt, material, base approval, drill data, embedment, torque and resistance for the supplied item. |
| Wedge anchor | A threaded stud with an expansion clip near its tapered end is installed through or below the fixture. Tightening the nut draws the clip onto the wedge and leaves a projecting male stud. | Often selected for permanent through-fixing in suitable solid concrete where approved data, geometry and installation support the required actions. | Stud projection, concrete-only limitations for many products, hole tolerance, edge forces and removability differ from a female TAM body. Do not transfer wedge-anchor loads to a TAM anchor. |
| Sleeve anchor | A sleeve surrounds much of a bolt or stud and expands as the cone is drawn into it. Head styles and base-material capabilities vary by product. | Can offer a broad bearing area and convenient through-fixing for suitable concrete or masonry applications. | Sleeve length, fixture clamping, head form, hole size and expansion distribution are not the same as every TAM configuration. Compare complete system data. |
| Rawl or shield bolt | A segmented shield expands around a central bolt, hook, eye or stud arrangement. “Rawl bolt” is also used generically in site language for several shield products. | Well-known general mechanical anchoring principle with configurations for brackets, eyes or hooks where the identified product supports the base. | Generic naming creates risk. Brand, shield segmentation, bolt form, setting torque and tested substrate must be identified. Read Shree OSR’s guide on Rawl bolt types and installation. |
| SS drop-in anchor | An internally threaded shell is set below or flush with the concrete surface using its prescribed setting tool. A separate bolt or threaded rod is installed afterward. | Creates a reusable female threaded point and a clean surface when the bolt is removed; commonly considered for suspended services in approved solid-concrete conditions. | Its displacement-controlled setting tool and full embedment differ from a bolt-activated TAM body. A drop-in’s internal thread does not make it the same product. See wedge vs drop-in anchors. |
| Chemical anchor | Qualified resin bonds a threaded rod, rebar or insert along a cleaned hole after the required cure. Some systems use screen sleeves in masonry. | Can provide engineered options without mechanical expansion during resin placement, including custom embedment or certain edge and retrofit conditions. | Resin, rod, substrate, hole creation, cleaning, temperature, working time, cure, installation direction and approval form one system. It is not a universal repair for failed mechanical-anchor holes. |
| Nylon plug | A polymer plug expands as a compatible screw enters it. | Useful for many light-duty, nonstructural fixtures when the plug and screw are approved for the wall material and environment. | Polymer behaviour, screw interface, fire performance and load range differ fundamentally from a metal TAM anchor. Never substitute it into structural or safety-critical work without design approval. |
Choose by installed interface
Decide whether the project needs a projecting stud, removable bolt, flush female thread, hook or eye, through-fixing or bonded rod. This immediately rules out many misleading look-alike comparisons.
Compare approved conditions
Put substrate, cracked condition, size, embedment, edges, spacing, exposure, load directions and installation beside each candidate. Compare like with like and document any proposed substitution.
Price the complete outcome
Include drilling, setting tools, resin or cure time, calibrated torque, testing, documentation, labour, replacement risk and future removal—not only the unit price of the metal item.
TAM anchor procurement and quality-control checklist
Preserve technical intent through enquiry, approval, delivery and installation. Scale the checklist to risk: a routine bracket may need basic identity and dimensions; critical work may require submittals, traceability and inspection.
1. Request for quotation
- Product family and required configuration
- Thread diameter, pitch and body length
- Bolt, nut, washer and head style
- Fixture thickness and drawing
- Base material and application
- Material grade and finish
- Quantity, delivery city and date
- Required sample or reference
2. Technical approval
- Order code and dimensioned data
- Drill, depth, cleaning and setting instruction
- Approved bolt and torque condition
- Applicable resistance or test evidence
- Edge, spacing and member limitations
- Corrosion and exposure review
- Required MTC, CoC or batch record
- Named authority for substitutions
3. Receiving inspection
- Purchase order and packing-list match
- Correct count and pack labelling
- Body, expander and bolt compatibility
- Thread gauge or fit check as specified
- Dimensions from an agreed sample plan
- Surface condition and damage check
- Certificate and batch correlation
- Dry, segregated site storage
4. Site release and handover
- Approved installers and briefing
- Correct drill and calibrated tools
- Mock-up or trial where specified
- Inspection and test hold points
- Nonconformance identification
- Approved repairs recorded by location
- As-built and torque/test records
- Spare or replacement strategy
Send one structured enquiry instead of several incomplete messages
Attach the anchor schedule or fixture drawing, identify the base and exposure, and state which documents must accompany the offer. If exact dimensions are not known, send clear photographs with a scale and an unused sample when practical. Shree OSR can then confirm available TAM anchor options, commercial terms and delivery; the project designer remains responsible for selection and installed capacity.
Related Shree OSR anchors, hardware and buyer resources
Use these links to understand alternatives and assemble companion parts. They do not imply that one item can replace another or that all linked products form a tested system together.
Related industrial products
Technical reading for procurement teams
Practical answers about stainless steel TAM anchors
These answers clarify search and purchasing questions without turning generic guidance into product-specific approval. Request the exact size data and installation document with your quotation.
What is a TAM anchor?
A TAM anchor is a mechanical expansion anchor used in a pre-drilled hole in a suitable mineral base. A metal body or shield expands as its compatible cone, wedge or bolt mechanism is activated, creating contact with the hole wall. Commercial configurations vary: some use an internally threaded body and separate bolt, while others are supplied as an anchor-bolt assembly. Confirm the exact construction before ordering or replacing an existing anchor.
What does “SS TAM anchor” mean?
It means the product is described as a stainless steel TAM anchor. “SS” does not, by itself, identify whether the alloy is 202, 304, 316 or another grade, and it does not state the bolt grade or strength. Put the required grade, finish and certificate on the enquiry. Make sure the expander, bolt, nut and washer are included in the material review.
Is Shree OSR’s TAM anchor made in India?
Yes, the current product attributes state “Country of Origin: Made in India.” If origin documentation, local-content declarations or traceability are contract requirements, list them in the RFQ and confirm what can be supplied for the particular order.
Can a TAM anchor be used in concrete?
The product page mentions concrete, but selection still depends on the exact anchor and concrete condition. Confirm compressive strength, cracked or uncracked design, member thickness, edge distance, spacing, reinforcement, embedment, load and installation data. Use product-specific resistance evidence; never copy the load capacity of another TAM or shield anchor.
Can it be installed in brick?
The listing also mentions brick, but masonry varies substantially. Identify solid or hollow unit, material, strength, dimensions, mortar and hole position. Expansion near a weak edge or in brittle masonry can cause splitting. Use only a product configuration with applicable base-material data and obtain engineering review where failure has significant consequences.
Can a TAM anchor be used in natural stone?
Possibly only under a suitable project-specific detail. Stone type, thickness, veining, weathering, edge distance and drilling quality affect splitting risk. Distinguish anchoring into a substantial structural stone base from attaching a thin façade panel. Stone cladding panels normally require a coordinated façade fixing design; see Shree OSR’s stone fixing anchor page for that separate product family.
Is a TAM anchor the same as a Rawl bolt?
Not necessarily. Both names may describe shield-style expansion principles, and site language sometimes uses “Rawl bolt” generically. However, the number and geometry of shield segments, internal components, bolt style, material, drill size, setting torque and tested base can differ. Compare identified product drawings and technical data rather than treating the names as synonyms.
Is a TAM anchor the same as a sleeve anchor?
No automatic equivalence should be assumed. A sleeve anchor normally has a sleeve surrounding much of the bolt or stud and often works as a through-fixing. A TAM body may provide a different shield and internal-thread arrangement. Even if both expand mechanically, their hole diameter, fixture interface, embedment and performance can differ.
TAM anchor vs wedge anchor: which should I choose?
Choose from the connection requirement. A wedge anchor usually leaves a projecting threaded stud and is widely used for permanent fixings in suitable concrete. A TAM configuration may accept a separate bolt and may be proposed for selected concrete or masonry conditions. Compare approved base materials, required interface, edge and spacing limits, load data, corrosion material, installation access and removability. There is no universal winner.
What hole size is required for a TAM anchor?
Use the drill diameter stated for the exact product code. Nominal bolt or thread diameter is not necessarily the drilled-hole diameter. Guessing or measuring only the widest visible part can create an oversized or undersized hole. Also obtain minimum drill depth, effective embedment, cleaning method and acceptable bit condition.
How tight should a TAM anchor bolt be?
Apply only the specified installation torque or setting instruction for the supplied anchor and bolt, using a calibrated tool where required. More torque is not automatically safer. It can damage threads, over-expand the body, crack a brittle base or distort the fixture. Lubrication, bolt material and coatings affect torque behaviour, so do not change them without approval.
Can the bolt be removed and reinstalled?
Some female-thread anchor arrangements allow a fixture bolt to be removed while the expansion body remains in place, but that does not make unlimited reuse acceptable. Check whether loosening affects anchor set, whether the internal thread is undamaged, whether a new bolt is required and whether re-torque is permitted. For maintenance-critical joints, state the removability requirement during design.
Can I install a new TAM anchor in an old anchor hole?
Only under an approved repair or replacement procedure. Existing holes may be enlarged, cracked, corroded, contaminated, too shallow or formed for a different mechanism. Identify the old product and survey the hole. The designer should determine whether it can be reused, re-drilled to another system, repaired or abandoned.
What is the load capacity of a TAM anchor?
There is no single TAM anchor load capacity. Resistance changes with product geometry, size, material, embedment, substrate strength and condition, edge distance, spacing, anchor group, load direction and installation quality. Request evidence for the exact supplied product and have a qualified designer apply the correct design method and safety factors.
Are stainless steel TAM anchors suitable outdoors?
Outdoor suitability depends on the exact stainless grade, companion components, chloride and pollution exposure, crevices, drainage, cleaning chemicals and service life. A polished finish alone is not an outdoor classification. Specify the exposure and have the material grade selected through the project corrosion assessment.
What information is needed for a TAM anchor price?
Send thread/bolt diameter, body and bolt length, configuration, grade, finish, quantity, base, application, fixture thickness, certificates, packing, delivery location and schedule. For replacements, add scaled photographs, drawings or an unused sample. Compare prices only after the technical scope and included components match.
Can Shree OSR supply other anchor types with the TAM anchor?
The live catalogue includes wedge, sleeve, Rawl, drop-in, chemical, hook-bolt and other anchor families plus bolts, rods and washers. Shree OSR can discuss availability and a consolidated commercial enquiry. The buyer and responsible designer must still keep product functions separate and confirm which components form each approved connection.
Does this page replace an engineer or installation manual?
No. It is a buying and specification guide. It deliberately avoids publishing invented dimensions, loads and torque values. Project drawings, applicable codes, the exact product data, approved method statement and competent engineering decisions govern structural, overhead, exterior and safety-critical work.
Request a stainless steel TAM anchor quotation
Send the size, configuration, grade, quantity, application, base material, documentation requirement and delivery location. Add a drawing or sample reference when the fixing must match an existing detail.
Technical notice: content is general product-selection information, not structural design, certification or a product-specific installation instruction. Availability, exact material, dimensions, components, documents and commercial terms must be confirmed in Shree OSR Enterprises’ quotation. Anchor design and site acceptance remain the responsibility of appropriately qualified project professionals.