
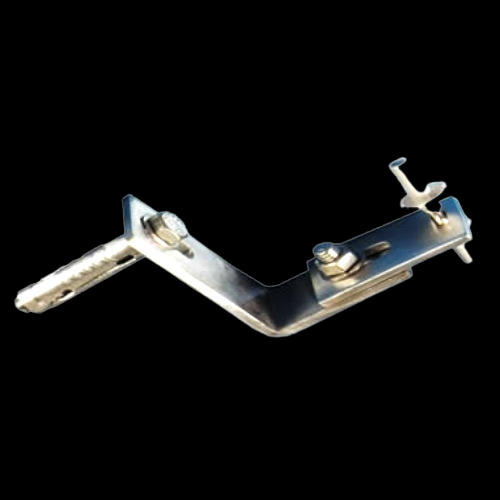
Dry Stone Cladding Clamp
| Size | as per required |
|---|---|
| Usage/Application | Industrial |
| Material | Customized |
| Color | Customized |
| Country of Origin | Made in India |
Dry Stone Cladding Clamps for Drawing-Led, Secure Façade Fixing
A dry stone cladding clamp is a purpose-selected metal fixing used within a mechanically anchored natural-stone cladding assembly. It connects or restrains the stone at defined support points so the façade does not depend only on a continuous mortar bed or surface adhesive. For contractors, façade fabricators, stone processors and procurement teams, the real requirement is therefore not simply “a clamp”; it is a compatible fixing selected around the stone, substrate, cavity, load path and exposure conditions of the project.
Shree OSR Enterprises supplies dry fixing stone cladding clamps for projects involving marble, granite and other suitable natural-stone panels. Requirements can be discussed by size, profile, metal, grade, finish, hole or slot arrangement and quantity. Where the application is non-standard, share a drawing, approved sample or clear dimensional sketch so the enquiry can be reviewed against the actual fixing detail.
Dry fixing is commonly chosen where a planned mechanical connection, controlled alignment and maintainable installation sequence are important. The clamp may support a panel, restrain movement, engage a kerf or drilled fixing point, or connect into an anchor and supporting framework. Its exact role depends on the system design. That is why clamp selection should be coordinated with the architect, structural or façade engineer, stone supplier and installer instead of being decided from a product photograph alone.
This page helps buyers prepare an accurate enquiry. It explains common configurations, material decisions, dimensional inputs, site coordination, installation control, inspection and related hardware. It does not replace project-specific engineering. Final type, spacing, thickness, metal grade, anchor, embedment and allowable load must be confirmed by the responsible project professional.
How a Dry-Fix Stone Cladding Assembly Transfers Load
A reliable façade detail creates a continuous and understandable load path. The stone is only one component; the clamp, its engagement with the panel, the connecting fastener or anchor, the rail or substrate and the building structure must work as one coordinated assembly.
Stone engagement
A pin, lip, kerf tab, bracket edge or other approved feature engages the prepared stone at a defined location. The detail must avoid uncontrolled point pressure and insufficient edge distance.
Clamp action
The selected clamp supports, retains or restrains the panel. Its geometry, thickness, bend radii, slot orientation and bearing area influence fit and behaviour.
Connection
A compatible bolt, screw, anchor, nut, washer or rail connection transfers the action from the clamp. Connection type must suit the substrate and approved design.
Supporting structure
The receiving concrete, masonry, steel frame or sub-framing carries the forces onward. Its condition, geometry and capacity cannot be inferred from the clamp alone.
Gravity from the stone panel is not the only design consideration. Wind pressure and suction, installation tolerances, thermal movement, moisture, building drift, seismic requirements where applicable, impact risk and construction-stage loads may affect the fixing arrangement. Some points are intended primarily to carry dead load, while others provide lateral restraint or permit controlled adjustment. Treating every clamp as interchangeable can unintentionally lock movement, leave a support point ineffective or concentrate stress in the stone.
Slots often help installation teams accommodate limited setting-out variation, but a slot is not a substitute for correct surveying or engineering. Its direction matters: a horizontal slot and vertical slot allow different adjustments. Washers, tightening procedure and final locked position also influence whether the connection performs as intended. Similarly, the stone preparation—such as a kerf, drilled hole or recess—must match the clamp engagement without excessive play or forced fitting.
Dry fixing does not mean “no sealants, isolation materials or secondary components anywhere.” Depending on the approved façade detail, the system may include rails, brackets, shims, isolation pads, gaskets, anchors and joint treatments. For compatible accessories, review the stone fixtures range, stone fixing anchors and neoprene foam sheet. Every interface should be checked for material compatibility, drainage, durability and installation access.
Important: The product seller can manufacture or supply against confirmed information, but the project’s engineer or façade consultant should establish the design loads, clamp locations, stone capacity, connection capacity, safety factors and acceptance criteria. Do not assign a universal load rating based only on clamp appearance or nominal size.
Choose the Clamp by Function, Not by Shape Name Alone
Stone-fixing hardware is described with familiar shape names—L, Z, C, J, T, up-down, angle or chair clamp—but trade terminology is not perfectly standardised. Two suppliers may use the same name for different dimensions or functions. A quotation should therefore pair the name with a drawing or sample and state what the fixing must do.
L-type clamps
An L-shaped clamp provides a simple change of direction between the support and stone engagement. It may be used in support or restraint details depending on orientation, thickness and connection. Compare the dedicated L clamp and L & T stone cladding clamp ranges.
Z-type clamps
Z profiles create an offset between two bearing planes and can help bridge a defined stand-off. The leg lengths, offset, hole positions and orientation need to match the approved detail. See the Z cladding clamp and marble fixing Z clamp.
C-type clamps
A C form can create a return or wrap around an element. Its actual use depends on the drawing, and the open side, internal clearance and connection arrangement must be stated. Review the C-type cladding clamp.
J-type clamps
A hook-like end may engage a slot, edge or associated component. The hook depth, throat, bend radius and bearing contact are critical ordering details. The J-type clamp page shows this related product family.
Up-down clamps
These are commonly discussed where adjacent panels or upper and lower engagement points need a coordinated fixing. The same piece may have different functional faces, so orientation matters. See the L-type up-down clamp.
Custom fabricated profiles
Non-standard cavities, rails or stone details may require a drawing-based clamp rather than a catalogue shape. Specify material, thickness, all legs, bend angles, slot and hole geometry, surface finish, tolerances and marking requirements.
| Selection question | Why it matters | Evidence to send |
|---|---|---|
| Is the point carrying or restraining? | Support and restraint positions can experience different forces and movement requirements. | Approved elevation/detail with point labels. |
| How does the clamp engage the stone? | Pin, kerf, lip and bearing details require different geometry and stone preparation. | Stone-edge detail and shop drawing. |
| What stand-off is needed? | The façade cavity determines leg length, offset and connection access. | Section through stone, cavity and substrate. |
| What adjustment is permitted? | Slot direction and length must align with the approved setting sequence. | Slot size, washer and locking detail. |
| What exposure applies? | Interior, exterior, coastal and chemical environments change material and finish decisions. | Project location and exposure statement. |
Material Is an Exposure Decision, Not a Colour Choice
The phrase “SS clamp” is incomplete for procurement. Stainless steel is a family of alloys, mild steel can be supplied with different protective finishes, and the visible surface says little about verified grade or coating quality. The project specification should identify the required material and any finish, testing or certification that applies.
Stainless steel is widely considered for concealed stone-fixing components because corrosion resistance can support long service in suitable environments. Buyers frequently request grades such as 304 or 316, but the correct grade must come from the project designer and exposure assessment. Chloride-rich coastal conditions, industrial pollutants, persistent moisture, cleaning chemicals and crevices can change the corrosion risk. “Stainless” should never be interpreted as immune to every environment.
Where a grade is specified, request corresponding material documentation and maintain grade separation during fabrication and packing. Surface contamination from carbon-steel tools or storage can undermine appearance and corrosion performance. Browse the related SS stone cladding clamp and read the guide on stainless steel vs mild steel cladding clamps.
Mild-steel clamps can be economical and readily fabricated, but bare steel is vulnerable to corrosion. If the approved system uses mild steel, the protective finish, coating thickness, treatment of cut edges and holes, post-fabrication coating sequence and acceptable repair method should be defined. A generic request for “silver finish” is not a durable technical specification.
Hot-dip galvanizing, zinc plating and other systems differ in process, coating build, suitability and appearance. A thick coating can affect hole clearance, threads and tight slots; fabrication must account for the selected finish. Do not substitute one zinc coating method for another without approval.
Clamps rarely work alone. Bolts, nuts, washers, pins, anchors, rails and shims may introduce other metals. Dissimilar-metal contact in the presence of moisture can create galvanic corrosion. The risk depends on the metal pairing, exposed area, electrolyte and environment. Compatible materials or suitable isolation details should be specified for the whole connection, not only the main clamp.
For connection components, see stainless steel bolt, nut and washer, wedge anchors and chemical anchors. Anchor choice is a separate engineering decision tied to the base material and approved loading.
Material thickness also cannot be selected from a “heavy duty” label. Capacity is influenced by alloy properties, width, unsupported length, bends, holes, slots, edge distances, load direction, connection eccentricity and fabrication quality. Increasing thickness may alter fit or stiffness without resolving a weak stone engagement or inadequate substrate. Conversely, copying the thickness from an unrelated project can produce a component that is unsuitable for the present geometry.
Finish and workmanship requirements may cover deburring, rounded exposed edges, clean bends, dimensional tolerances, passivation or other treatment where specified. Welded components need an approved weld procedure, inspection and post-weld surface treatment appropriate to the material. If the clamp will remain visible through open joints, appearance criteria should be agreed using a sample instead of assumed from a written colour description.
Avoid silent substitutions
A quotation should identify exactly what is offered. If the buyer requests SS 316 and the offer is SS 304, or requests hot-dip galvanized steel and the offer uses a different zinc finish, the difference must be visible before approval. Substitutions require review by the responsible project authority. For broader compatibility principles, consult the educational article on galvanic corrosion and mixed-metal fasteners.
Build an Unambiguous Dry Stone Cladding Clamp Specification
Accurate pricing begins with controlled inputs. A short description such as “one-inch SS dry clamp” may omit the dimensions that govern manufacturing and installation. The following matrix converts a vague enquiry into information a supplier can review, quote and reproduce consistently.
Profile and orientation
Name the profile, but also show front, side and plan views. Mark which face points toward the stone, substrate and top of the building. Mirrored parts should have separate item references.
Overall geometry
State total length, width, each leg length, offset, return, hook depth and all relevant angles. Identify whether dimensions are internal, external or centreline values.
Thickness
Specify nominal sheet or plate thickness and acceptable tolerance. Do not infer thickness from product weight or a low-resolution photograph.
Holes and slots
Give diameter, slot length and width, centre location, orientation, quantity and edge distance. Include the intended bolt or fastener size so clearance can be reviewed.
Stone engagement
Define pin diameter and projection, lip size, kerf-tab geometry, bearing area or other engagement. Coordinate it with the stone processor’s approved preparation.
Material designation
Write the metal and grade specified for the project. If equivalents are allowed, identify who can approve them and what evidence is required.
Surface treatment
State finish, coating process and any post-fabrication treatment. Clarify visible-face appearance only where it is a genuine project requirement.
Fabrication details
Provide bend radii, weld size and location where applicable, edge finish, burr limits and critical tolerances. Mark dimensions that cannot be changed.
Inspection documents
List required material certificates, dimensional report, finish or coating report, sample approval, batch marking and third-party inspection instead of requesting “all certificates.”
Commercial inputs
Give quantity by part code, delivery location, required date, packing method, phased delivery plan and whether a pre-production sample is needed.
Revision control is essential. Put a drawing number, revision and date on the RFQ, purchase order, approved sample and inspection record. If the site changes a cavity dimension or stone thickness, issue a revised document rather than marking up different copies informally. For complex façades, a small batch or approved physical sample can confirm manufacturability and site fit before full production; it does not replace structural approval.
If several clamp profiles are used, create an item schedule. Use a unique code for each handed, upper, lower, corner or intermediate component. The code can appear on bags or cartons to reduce mixing during installation. Quantity take-off should include only the project-approved allowance for wastage or spares, not an arbitrary percentage.
Example RFQ line format
DSC-04 | Z-type clamp | drawing DSC-04 Rev C | material/grade as specified | thickness as drawing | slotted hole and stone-engagement detail as drawing | required finish | quantity ___ | inspection documents ___ | delivery to ___ by ___.
Attach the drawing and approved project specification. Send your requirement through the contact page for a reviewed quotation.
Where Dry Stone Fixing Clamps Are Considered
Dry stone cladding clamps may be specified in new construction, fit-outs, refurbishments and façade replacement work. Suitability depends on the complete wall build-up and engineering, not merely on whether natural stone is present.
Exterior natural-stone façades
Exterior installations can be exposed to wind, rain, temperature cycles, pollution and access constraints. The design should coordinate joints, drainage, ventilation where required, cavity depth, fire and insulation interfaces, corrosion resistance and the movement of both stone and supporting structure. Clamps may sit behind open or sealed joints, so installation access and inspection visibility should be planned.
High-rise use requires project-specific façade engineering and testing where required. A supplier should not assign a clamp based solely on building height. The guide on specifying cladding clamps for high-rise façades lists questions worth raising at design and procurement stage.
Interior walls, lobbies and feature surfaces
Interior stone may avoid direct weather, but panel weight, substrate adequacy, public access, impact, moisture from cleaning and movement still matter. Feature walls can include corners, reveals, signage, service penetrations and transitions that require different clamp geometries. Concealment should not make tightening or inspection impossible.
Marble and granite cladding
Marble, granite and other stones differ in strength, grain, fissures, water absorption, thickness and response to localised bearing. The stone supplier or competent designer should confirm whether the selected panel and anchorage preparation are suitable. Clamp geometry should be coordinated with the actual stone, not a generic material label. Related options include the SS marble angle and stone fixing marble bracket.
Columns, soffits, corners and returns
Geometric transitions often produce short panels, non-typical restraint directions and restricted tool access. Soffit or overhead stone deserves especially careful design because consequences of detachment are severe. Corner pieces and returns may also behave differently from typical field panels. Schedule these as separate details and part codes.
Renovation and replacement
Existing substrates must be surveyed rather than assumed to match old drawings. Repair work can reveal variable cavity depth, damaged stone, corroded embedded metal, weak masonry or inaccessible connections. A new clamp should not be used to conceal an unresolved substrate or stone defect. The engineer should establish the investigation, pull-out testing, repair and acceptance plan appropriate to the building.
From Approved Drawing to Installed Clamp: A Controlled Workflow
Installation quality begins before hardware reaches the scaffold. The most effective workflow links design approval, survey information, procurement, sample verification, material control and site records. The steps below are a coordination guide; the approved method statement and project professional remain authoritative.
Freeze the design basis
Confirm stone type and thickness, panel module, joints, cavity, support and restraint locations, substrate, design actions, anchor system, clamp schedule, materials and interfaces. Resolve corners, openings, parapets, soffits and movement joints rather than treating the typical elevation as the whole project.
Each clamp drawing should show its function, orientation and connection. A general note that says “provide suitable clamps” transfers uncertainty downstream and makes comparable quotations difficult.
Survey the receiving construction
Check line, level, plumb, as-built offsets, concrete edges, reinforcement constraints, masonry condition and available fixing depth. Survey data should be compared with the adjustment range of the approved bracket and clamp assembly. Do not use slots to absorb unlimited deviation.
Where anchor proof or pull-out testing is required, follow the engineer’s test plan. A test result from one substrate or anchor cannot automatically validate another.
Approve samples and records
Verify a representative clamp against the controlled drawing: profile, material, thickness, dimensions, hole locations, slot geometry, bends, pin or lip and finish. If a benchmark assembly or mock-up is required, record approval and any changes before bulk production.
Receiving inspection should connect purchase-order item codes to labels, quantities and requested documentation. Quarantine mixed, damaged, corroded or unidentifiable items until disposition is agreed.
Prepare stone and substrate correctly
Stone kerfs, holes or recesses should be formed with approved equipment, locations and tolerances. Reject or refer panels with cracks, spalls, weak edges or preparation outside acceptance criteria. Drilling into the supporting substrate should follow the specified anchor system’s instructions, including hole diameter, depth and cleaning procedure.
For anchor-system context, compare chemical and mechanical anchors. This comparison is educational; the project detail must identify the permitted product and installation procedure.
Set, adjust and secure
Install components in the sequence defined by the method statement. Maintain required bearing, engagement and clearance. Shims or isolation pieces should be of approved material and position. Fasteners should be tightened using the specified procedure and calibrated equipment where torque control applies; a universal torque value should not be copied across different diameters, grades, lubricants or finishes.
Do not force a misaligned clamp into place, open a hole with uncontrolled site cutting, re-bend a finished component or pack an excessive gap unless an approved repair or variation authorises it.
Inspect before concealment
Check clamp identity and orientation, stone engagement, anchor location, washer seating, locked adjustment, edge distances, visible damage, material separation and completion of required records. Photograph representative and critical locations before the next panel or closure hides the connection.
Inspection frequency and hold points should follow the project quality plan. Traceability is especially valuable where several similar profiles or material grades are present.
Stop-work conditions worth defining
Pause and seek direction when the substrate differs from the drawing, required embedment cannot be achieved, stone is cracked near the fixing, the clamp does not seat without force, the wrong grade or profile is delivered, coating is materially damaged, the slot reaches the end of its adjustment, required edge distance is unavailable, or the installed arrangement conflicts with fire, waterproofing or another façade component. Recording a deviation is safer and less costly than hiding it behind the next panel.
Quality Checks That Protect Fit, Traceability and Installation
Quality assurance should focus on the characteristics that matter to the approved design. A long generic certificate list adds paperwork without necessarily controlling the right risks. Agree the inspection and documentation plan before production.
Before dispatch
- Drawing number and revision match the purchase order.
- Material and grade match the approved requirement.
- Thickness, width, leg lengths and offsets are within stated tolerances.
- Hole and slot dimensions, positions and orientations are correct.
- Bends, pins, lips and welds match the approved sample or drawing.
- Edges and holes are free of hazardous burrs.
- Specified finish or post-fabrication treatment is complete.
- Part codes, quantities and packing labels are readable.
At site receipt
- Packages show the correct project, item code and batch identity.
- Quantity agrees with the dispatch documents.
- No unacceptable bending, impact damage, contamination or corrosion is visible.
- Certificates and reports can be matched to delivered items.
- Different grades and handed components remain segregated.
- Storage is dry, organised and protected from damaging contact.
- Approved sample or dimensional reference is available to inspectors.
During installation
- Correct clamp type and orientation are used at each point.
- Stone preparation and engagement are complete without forced fit.
- Anchor, bolt, washer and isolation components match the detail.
- Adjustment remains within the approved range.
- Tightening and locking follow the method statement.
- Clamps are not site-cut, re-drilled or re-bent without approval.
- Required hold-point records are completed before concealment.
Sampling frequency should reflect project specification, batch size, production method and risk. Critical dimensions may require a more defined sampling plan than cosmetic characteristics. Measuring instruments should be suitable for the tolerance and within their calibration controls. If testing is specified, define the standard, sample preparation, acceptance criteria, reporting party and link to the production batch.
A material test certificate can support grade traceability, but it does not by itself prove that a finished clamp has the correct dimensions, fabrication or capacity in the project assembly. Similarly, a visually correct clamp is not evidence of material grade. Documentation and physical inspection answer different questions.
Frequent Cladding-Fixing Problems—and the Control Behind Each One
Failures are rarely caused by one isolated product characteristic. Design assumptions, material compatibility, fabrication, substrate condition, installation and inspection can interact. These examples are warning signs, not a diagnostic substitute for a competent site investigation.
Wrong clamp at the right location
Similar profiles or mirrored pieces can be mixed. Use distinct item codes, orientation marks, segregated packaging and an installation elevation that identifies every fixing type.
Correct profile, wrong dimensions
An L or Z name does not control leg length, offset, slot or thickness. Inspect production against a dimensioned, revision-controlled drawing and approved sample.
Inadequate stone edge condition
A kerf or hole too close to an edge, damaged during machining or forced around a misaligned clamp may initiate cracking. Coordinate stone preparation and reject defects under the approved criteria.
Corrosion or metal incompatibility
Incorrect grade, damaged protection, contaminated stainless steel, trapped moisture or dissimilar metals can accelerate deterioration. Specify the full material pairing and isolation strategy for the environment.
Anchor installed outside its conditions
Wrong hole diameter, poor cleaning, inadequate embedment, proximity to an edge, unsuitable base material or premature loading can compromise the connection. Follow the approved anchor design and manufacturer procedure.
Adjustment exhausted
When site deviation exceeds the designed slot or bracket range, installers may force or alter components. Survey early and obtain an engineered revised detail instead of improvising.
Movement unintentionally restrained
Over-constraining a panel can introduce stress as stone, frame and building move differently. Support and restraint functions, joint widths and slot directions must follow the engineered scheme.
Unrecorded site modification
Cutting, welding, drilling or re-bending can change section capacity, corrosion protection and geometry. Define a deviation process and require approval before alteration.
Plan the Purchase Around the Project Sequence
Request a comparable quotation
Issue the same controlled RFQ package to every bidder. Separate each clamp type and quantity, identify inclusions such as pins or washers, state inspection documents and clarify taxes, freight, packing and delivery terms. A lower unit rate is not directly comparable if material grade, thickness, finish or scope differs.
Confirm manufacturability early
Complex bends, very short returns, tight internal radii, slots close to edges and post-fabrication coating can affect feasible tolerances. Early supplier review may reveal a manufacturing constraint, but any design change must go back through the project’s approval route.
Use samples intelligently
An initial sample can verify geometry, hole alignment, access and identification. The approved sample should be labelled with drawing revision and retained as a reference. It is not a capacity test unless it forms part of an engineered, documented test programme with defined acceptance criteria.
Order by item code
A project may use support, restraint, corner, jamb, sill, head and soffit components that look similar. Purchase-order lines, carton labels and site stores should use the same item codes as shop drawings. This reduces selection errors and simplifies reconciliation.
Protect clamps in storage
Store packages off wet floors and away from chemicals, grinding dust and damaging contact. Keep stainless steel protected from carbon-steel contamination and keep different grades separated. Avoid over-stacking cartons if it can deform thin or projecting features.
Sequence deliveries
Phased delivery can reduce congestion and loss, but only if packages align with elevations or installation zones. Agree dispatch notice, delivery access, offloading responsibility and shortage reporting. Count items at receipt while batch labels remain intact.
Manage revisions and extras
If the façade geometry changes, identify which uninstalled items remain usable and which require revision. Never mix superseded and current parts in one store location. Spare quantities should be based on project instruction and real handling risk, with the same grade and revision as installed components.
Assess total procurement value
Unit price is only one cost. Consider drawing responsiveness, correct labelling, dimensional consistency, material evidence, packing, delivery reliability and the cost of site rework. The broader guide on writing an accurate fastener RFQ helps structure enquiries.
Need a quote for dry fixing clamps?
Send the drawing, material, thickness, finish, quantity and delivery location. The team can review the supply requirement and respond with the information needed to proceed.
Build the Complete Stone-Fixing Package
A useful product page should help project teams move to the next relevant decision. These links connect the dry stone cladding clamp to closely related products and technical reading without forcing unrelated catalogue items into the buying journey.
Clamps and brackets
Compare profile families only after defining the required support or restraint function.
Anchors and connections
The anchor and fastener must be selected for the actual substrate and approved loading.
Stone-fixing buyer guides
Use these articles to prepare design-review questions and procurement inputs.
Material and selection guides
Review corrosion, materials and specification before approving a substitute.
Dry Stone Cladding Clamp FAQs
Quick answers for buyers, contractors and project teams preparing a clamp enquiry.
What is a dry stone cladding clamp?
It is a metal component used in a mechanically fixed stone-cladding assembly. Depending on the approved detail, it may support a natural-stone panel, restrain it laterally or connect the stone engagement to an anchor, rail or substrate. “Dry” generally distinguishes the mechanical fixing approach from an installation relying primarily on a full mortar bed. The clamp is only one part of the engineered façade system.
Is a dry cladding clamp suitable for both marble and granite?
Potentially, but suitability cannot be decided from the stone name alone. Marble, granite and other natural stones vary by source, structure, strength, fissures, thickness and panel geometry. The designer should confirm stone testing, fixing position, edge distances, kerf or hole geometry and design loads. A clamp used successfully on one stone or panel size should not automatically be copied to another.
Which is better for cladding clamps: SS 304 or SS 316?
Neither is universally “better” without context. The project’s environmental exposure, corrosion assessment, design life, adjoining metals and specification should determine the grade. SS 316 is often considered where chloride exposure is more demanding, but the project professional must make the selection. State the exact grade in the enquiry and request the documentation required to verify it.
Can mild-steel dry stone clamps be used outdoors?
Only where the approved design permits them with a suitable corrosion-protection system. The coating process, coverage after fabrication, treatment of edges and holes, compatibility with connected parts and expected exposure all matter. A painted or silver-looking surface is not enough information. Exterior components should be specified through a durability assessment rather than price alone.
What sizes of dry stone cladding clamps are available?
Sizes can be discussed against the project requirement, but “size” includes much more than overall length. It may include width, thickness, leg lengths, offset, bend angles, hole diameter, slot dimensions, pin or lip projection and stand-off. Send a dimensioned drawing or approved sample. Avoid publishing or ordering one default size unless that size has been confirmed for the exact assembly.
Can Shree OSR Enterprises supply custom cladding clamps?
Custom requirements can be reviewed when the buyer provides adequate information such as a drawing, material and grade, thickness, finish, hole and slot details, tolerance, quantity and delivery location. The supplier may comment on manufacturability; design responsibility, loading and approval remain with the project’s authorised engineer or façade consultant.
How do I select between L, Z, C and J clamps?
Begin with the required function and wall section, not the letter. Identify the stone engagement, supporting point, cavity, adjustment direction, anchor connection, access and movement requirement. Then match a profile to the approved detail. Because trade names can vary, attach a sketch or drawing even when you know the common shape name.
How many clamps are required per stone panel?
There is no safe universal number. Quantity and location depend on panel dimensions and weight, stone properties, wind and other design actions, orientation, support and restraint scheme, anchor capacity, substrate and applicable safety factors. The responsible designer should issue the fixing layout. A supplier quotation should follow that schedule rather than estimate points from square metres alone.
What load can a dry stone cladding clamp carry?
A credible load value requires a defined clamp geometry and material, load direction, connection, anchor, substrate, stone engagement and acceptance method. Capacity can also be governed by the stone or anchor rather than the metal clamp. Do not use a generic load copied from a different product. Ask the project engineer to establish design resistance and any required component or assembly testing.
Are slotted holes better than round holes?
Slots can provide controlled adjustment in a chosen direction; round holes can provide more definite positioning. The correct option depends on how the detail is designed to be set and locked. Slot length, width, orientation, edge distance, washer coverage and final bolt position all matter. A slot should not compensate for survey deviation beyond the approved adjustment range.
Can the clamp be drilled or bent at the construction site?
Not without an approved procedure. Site drilling or re-bending can change net section, edge distance, fit, material condition and corrosion protection. Welding introduces further metallurgical, distortion and finish considerations. If a clamp does not fit, record the mismatch and obtain an authorised revised detail or replacement rather than modifying it informally.
What documents should I request with the order?
Request only documents relevant to the specification: approved drawing and revision, material certificate where required, dimensional inspection, finish or coating evidence, sample approval, batch identification, packing list and specified test reports. Agree the document list before quotation. A certificate package cannot compensate for missing design approval or poor site installation.
How should stainless-steel clamps be stored?
Keep them dry, protected from deformation and segregated by grade and item code. Avoid contamination from carbon-steel grinding dust, dirty racks or tools. Retain batch labels until installation and use packaging that protects projecting pins, lips and finished faces. If contamination or corrosion is suspected, follow an approved assessment and cleaning procedure rather than abrasive improvisation.
Do dry clamps remove the need for sealant or waterproofing?
No. Mechanical fixing addresses support and restraint; the façade’s water management, joints, cavity drainage, air barrier, insulation, fire stopping and sealants are separate coordinated parts of the wall design. Some systems use open joints, others sealed joints. Follow the approved façade build-up and do not allow a clamp substitution to interfere with another layer.
What information is needed for a price?
Send the profile or drawing, every critical dimension, material grade, thickness, finish, quantity, inspection requirements, packing, delivery destination and required schedule. Mention whether pins, anchors, bolts, nuts or washers are included. Pricing without these details may be only a provisional indication because changes in grade, mass, fabrication, finish or quantity can alter the offer.
Does a sample approval prove structural capacity?
No. A sample usually confirms appearance, geometry, workmanship and fit against a reference. Structural capacity must be established through engineering calculations and testing where specified, using defined materials, boundary conditions, load direction and acceptance criteria. Do not treat an installer’s manual pull or a visual sample check as a certified load test.
Can one clamp detail be repeated across the entire façade?
Only if the project design confirms it. Corners, edges, openings, soffits, parapets, returns, movement joints and different substrates may require other profiles or capacities. Wind zones can also vary over a façade. A complete clamp schedule should identify typical and non-typical conditions and prevent the field detail from being copied into locations it was not designed to serve.
Where can I send a drawing for quotation?
Use the Shree OSR Enterprises enquiry page. Include contact details, project location, clamp schedule or drawing revision, material, quantity and delivery requirement. If the detail is still under development, clearly label it “for budget enquiry” so a provisional discussion is not mistaken for a fabrication approval.
Request Dry Stone Cladding Clamps for Your Project
Share your approved drawing or dimensional requirement for dry fixing stone cladding clamps. Include the stone application, metal grade, thickness, finish, hole or slot arrangement, quantity and delivery location for a clear commercial response.
All final selections and installation details remain subject to project-specific design, approvals and applicable standards.