
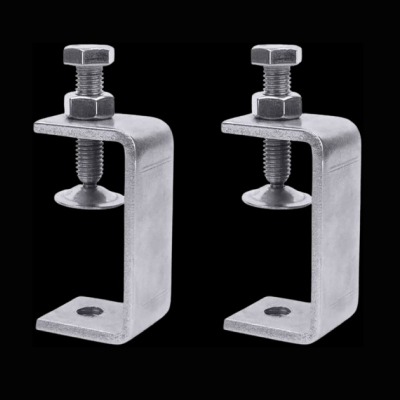
C TYPE CLADDING CLAMP
C type cladding clamps specified around the connection—not the product name alone
A C type cladding clamp is a shaped metal fixing used within selected stone, marble and façade-support details. Its recognisable profile can provide an offset, return or gripping interface where a flat strip or simple angle would not match the approved arrangement. Yet “C clamp” is only the starting description. The dimensions, material, thickness, holes, slots, pin arrangement, surface condition and companion fasteners determine what is actually being purchased.
Shree OSR Enterprises supports commercial enquiries for C type cladding clamps and related stone-fixing hardware across India. Buyers can submit a drawing, bill of materials, sample or dimensioned requirement for review. This requirement-led process helps contractors, façade fabricators, stone processors, purchasing teams and distributors avoid a common procurement error: ordering a familiar-looking clamp whose geometry does not fit the cavity, stone preparation or backing connection.
This page explains how to describe the clamp, where it may sit in a mechanical cladding assembly, what must be checked before approval, and how to request a useful quotation. It does not assign a universal load capacity or declare one configuration suitable for every elevation. Final selection belongs to the approved façade design and the qualified professionals responsible for the project.
What makes a stone-fixing clamp “C type”?
The letter describes the broad profile when the component is viewed from an end or side; it is not a complete technical standard. Two C-shaped clamps can look similar in a catalogue image while differing materially in projection, stiffness, hole position, stone engagement and intended load path.
Back or connection leg
One region of the clamp normally connects toward a supporting bracket, channel, anchor, bolt or prepared base. Whether that interface uses a round hole, slot, weld, threaded part or separate fastener must be stated. The supporting element, edge distance and access for tightening affect the detail.
Offset or web
The middle portion creates the required stand-off between planes. Its depth needs to correspond with the actual cavity, tolerances, insulation zone and façade build-up. Increasing the projection is not a harmless dimensional change; it can change stiffness and force distribution.
Stone-side return
The outer return may support or restrain a prepared stone interface, depending on the engineered configuration. Slot dimensions, pin diameter, contact pad, shim and clearance must suit the stone fabrication detail. A clamp must not be forced into an undersized kerf.
Holes and elongated slots
Round holes generally locate a fixing more positively; elongated slots may provide controlled adjustment in a defined direction. Slot orientation should follow the drawing. An installation team should not enlarge holes on site unless an approved procedure specifically allows it.
Bends and inside radii
A formed clamp has bends rather than infinitely sharp corners. Bend radius, forming direction and material condition influence the finished dimensions. These details matter when a tight cavity or adjoining component leaves little clearance.
Material identity
“Stainless,” “SS” and “silver finish” are not interchangeable specifications. Where stainless steel is required, state the grade shown by the project documents. Where another metal or finish is proposed, obtain written approval before treating it as equivalent.
A useful drawing establishes datums and labels the overall profile, leg dimensions, width, thickness, bend radii, hole or slot sizes, centre distances, welds, pins and tolerances. It should also identify whether the item is handed, reversible or repeated in more than one orientation. If only a physical sample is available, record critical dimensions before quotation and keep an approved reference sample for production comparison.
C-shaped hardware is often searched under phrases such as C clamp for stone cladding, marble fixing C clamp, C type stone anchor and stainless steel façade clamp. These phrases help discovery, but purchasing should return to a dimensioned requirement. For an overview of adjacent formats, compare the stone fixing anchor range and the dedicated façade fixing clamp page.
The clamp is one link in a complete load path
A product page can show a component; the façade design must show how forces travel. Stone self-weight, wind pressure and suction, thermal movement, building movement, construction tolerances and any project-specific actions need a continuous route through the stone interface, clamp, fastener, bracket or rail, primary anchor and supporting construction.
If any interface is undefined, selecting a thicker clamp does not automatically repair the design. The connection could instead be governed by local stone stress, inadequate edge distance, bolt bearing, weld quality, anchor capacity, weak masonry, channel movement or excessive stand-off. The responsible designer should determine the actions, combinations, safety factors, deformation limits and required evidence.
Where C profile clamps may be considered
The following scenarios explain why a C-shaped profile might appear in a detail. They are not permissions to substitute the product into an unreviewed assembly.
Natural-stone wall cladding
Granite, marble, sandstone, limestone and other dimension-stone panels may use mechanical fixing arrangements where metal hardware supports or restrains prepared stone edges. A C type stone cladding clamp may suit a particular cavity or edge detail when its geometry aligns with the engineered drawing.
Confirm stone test data, panel thickness, edge quality, bedding or veining direction, slot preparation, movement and exterior exposure.Interior marble and feature walls
Interior work can still involve heavy panels, public circulation zones and concealed connections. The absence of exterior wind or rain does not remove the need to check self-weight, impact risk, fire and substrate conditions. Finishes, joints and limited access can make dimensional coordination especially important.
Confirm backing construction, cavity, panel format, support level, service penetrations and the sequence for inspection before concealment.Ventilated or dry-fixed façade zones
Dry-fix assemblies rely primarily on coordinated mechanical components rather than mortar bedding alone. A C clamp can be one part of the connection between the panel and support system. Drainage, ventilation, insulation, fire barriers and thermal movement remain system-level design matters.
Review the site’s guide to dry-fix versus wet-fix cladding hardware before preparing the bill of materials.Refurbishment and replacement panels
A replacement may need to interface with existing construction whose true dimensions differ from old drawings. Surveying is essential. Existing corrosion, cracked stone, damaged anchors, uncertain substrate or incompatible metals should be investigated rather than hidden by a new clamp.
Record opening-up observations and obtain design approval for the repair. A sample copied from the façade may already be deformed or corroded.Project-specific brackets and fabrications
Some enquiries begin with a consultant detail or fabricator’s coordinated shop drawing. In these cases, the clamp may require non-standard leg lengths, hole patterns or companion components. Manufacturing feasibility should be resolved without silently changing the structural intent.
Issue revision-controlled drawings, identify critical dimensions and obtain approval for any proposed manufacturing adjustment.Mock-ups and approval samples
Visual or performance mock-ups can expose access, tolerance, stone-preparation and sequencing problems before repetition across the building. The clamp used in the mock-up should be traceable to the intended production configuration.
Record the approved sample, product identification, installation method and accepted changes before bulk release.Exposure drives the conversation
An interior dry zone, an exterior urban façade, a coastal elevation, an industrial atmosphere and a periodically wet cavity do not present the same corrosion conditions. Consider moisture retention, salts, pollutants, drainage, cleaning chemicals, contact with mortar or stone treatments, temperature cycles and the difficulty of future access. The project specifier should choose material and protection for the actual environment and intended service life.
Keep connected metals compatible
The clamp does not work in isolation. Pins, bolts, nuts, washers, rails, anchors and backing plates may touch it directly or be electrically connected through moisture. Dissimilar metals can create galvanic-corrosion concerns, particularly when a relatively small, less-noble component is connected to a larger noble surface. Review the whole assembly, isolate metals where the approved design requires it and avoid casual on-site substitutions.
Fabrication can alter the final condition
Cutting, bending, punching, drilling, welding, grinding and finishing influence dimensions and surface condition. A stainless component may need suitable post-fabrication cleaning or treatment under the applicable specification. Carbon-steel contamination from shared tools or work surfaces should be controlled where stainless cleanliness matters. Weld procedure, filler, heat tint treatment and inspection requirements should be stated when welding forms part of the item.
Certificates support—not replace—verification
A material certificate can help establish chemistry, grade or batch identity, depending on its type and scope. It does not by itself validate the clamp geometry, installed load capacity or suitability for a particular stone. Link documents to the delivered lot, compare markings and quantities, and retain records required by the inspection plan.
A practical C type cladding clamp enquiry schedule
Replace vague requests such as “send best rate for C clamp” with a schedule that can be checked, quoted and approved.
| Field | What to state | Why it matters |
|---|---|---|
| Item reference | Drawing number, detail mark, clamp code and current revision. | Separates similar profiles and reduces quotation against an obsolete sketch. |
| Function | Bearing, restraint, combined role or other design-defined purpose. | Prevents an apparently similar clamp being used in the wrong position. |
| Profile geometry | Overall height, overall projection, return lengths, width and orientation. | Coordinates the cavity, stone edge and backing connection. |
| Thickness | Nominal metal thickness with relevant tolerance or product-form reference. | Influences stiffness, hole bearing, bend formation and fit with adjacent parts. |
| Holes and slots | Diameter or length × width, centre positions, direction and edge distances. | Controls compatibility, adjustment and the remaining metal around openings. |
| Bends | Inside radius, angles, bend direction and critical post-forming dimensions. | Removes ambiguity where forming changes the developed and finished sizes. |
| Stone interface | Pin, kerf, slot, return, pad, shim or other prepared contact detail. | Helps avoid concentrated bearing, loose fit or damage during installation. |
| Material | Exact grade/specification, product form and any restricted alternatives. | Defines corrosion and mechanical expectations more clearly than “SS.” |
| Finish | Required surface condition and any cleaning, passivation or coating requirement. | Supports environmental durability and appearance where parts remain visible. |
| Companion parts | Bolts, nuts, washers, pins, anchors, shims and channels included or excluded. | Establishes whether the quotation covers a component or complete assembly. |
| Quality records | Certificate type, dimensional report, sample, inspection or traceability needs. | Allows documentation cost and timing to be included before order placement. |
| Commercial scope | Quantity, releases, packing, delivery location, schedule and tax details. | Enables a comparable quotation and realistic dispatch plan. |
Attach the elevation or a marked-up quantity schedule when multiple clamp codes are used. If dimensions repeat except for one variable, identify that variable clearly rather than issuing several unlabelled screenshots. For left- and right-handed items, provide both views and quantities. State whether dimensions shown are finished dimensions or flat-development dimensions.
When an approved sample controls appearance or fit, package and label it to prevent damage or mix-up. A sample without a linked drawing can still be ambiguous: hole tolerance, material identity and previous site modification may not be visible. Use the sample together with written acceptance criteria.
From façade requirement to an orderable clamp
Define the panel and environment
Record the stone type, source or approved sample, panel dimensions, thickness, finish, backing or reinforcement, edge condition and intended location. Identify interior or exterior exposure, elevation, building height context, moisture and corrosivity factors. A stone name by itself does not establish allowable contact stress or anchor behaviour.
Establish actions and movement
The project engineer determines design actions, combinations and required factors. Coordinate dead load, wind, movement, tolerance, seismic or impact requirements where applicable. Distinguish supports from restraints and fixed points from sliding or adjustable points. A slot intended for installation adjustment must not be confused with a movement joint.
Verify the supporting construction
Identify concrete strength and condition, masonry unit and joint locations, structural steel, or the engineered support rail and its attachment. Confirm edge distances, member thickness, reinforcement or service conflicts, waterproofing and access. If a mechanical anchor is involved, review the project’s qualification and installation requirements rather than transferring a capacity from another substrate.
Coordinate the cavity and interfaces
Survey or calculate the stand-off from structure to stone. Include levelling, substrate variation, insulation, membranes, channels, fire stops, ventilation and drainage. Set adjustment ranges without relying on the extreme end of a slot as routine practice. Ensure installers can insert, align, tighten and inspect the connection.
Detail the C clamp
Translate the coordinated arrangement into a dimensioned component: profile, width, thickness, bends, openings, pins and finish. Identify tolerances that affect fit. Compare other shapes only by intended function and drawing—see the site’s stone and marble fixing clamp buyer’s guide and the L and T stone cladding clamp listing.
Prototype, approve and release
Use a first-off sample or mock-up when required. Confirm fit, stone preparation, access, adjustment, contact, finish and installation sequence. Close comments through a controlled revision. Release production only from the approved information, and communicate changes to procurement, fabrication, site supervision and inspection teams.
C clamp, L clamp, Z clamp or a developed anchor?
Alphabet names describe shape more readily than engineering function. Use them to navigate a catalogue, then select from the approved load path and coordinated geometry.
C type clamp
A C profile provides two returns connected by an offset web. It may suit a detail needing a wrapped, returned or double-plane relationship. The two returns do not prove that both are structural contact points. State orientation and function.
L type clamp
An L shape creates one change of direction and a right-angle relationship. It can be simpler where a support or connection needs only two principal legs. Compare the dedicated product or the combined L and T clamp family.
Z type clamp
A Z profile creates an offset between broadly parallel connection faces. It may bridge a cavity or coordinate components on different planes. Reversing an asymmetric Z changes the orientation, so handed quantities and drawings can be important.
Body or adjustable anchor
A more developed body anchor may combine a substantial stand-off, slot, bolt, pin or multiple pieces. It can offer a different adjustment strategy, but also creates more interfaces to specify, assemble and inspect.
Installation control begins before the clamp reaches the wall
A correctly fabricated clamp can still fail to fulfil its role if the substrate is misidentified, the stone slot is damaged, the wrong fastener is used or the connection is concealed without inspection. Use the project method statement, approved shop drawings and product-specific instructions. The sequence below is a coordination checklist, not a replacement for those documents.
Receive and identify
Check delivery against the purchase order and approved drawing. Separate clamp codes, handed items, grades and batches. Inspect for transit damage, distortion, corrosion, contamination, sharp burrs and missing companion parts. Quarantine items that cannot be positively identified.
Store and protect
Keep hardware dry, clean and off the ground. Protect finished stainless from carbon-steel grinding debris and site chemicals. Do not mix returned, rejected and approved stock. Retain labels and certificate links through installation where the quality plan requires traceability.
Set out from control lines
Use the approved façade datum and surveyed substrate, not an accumulation of panel-to-panel dimensions. Mark anchors and clamp positions, check edges and embedded services, and escalate discrepancies before drilling or fabricating ad hoc packers.
Prepare the backing connection
Install the specified channel or anchor in the verified base material. Hole diameter, depth, cleaning, embedment, spacing, edge distance, torque and curing are product- and design-specific. Review the internal anchor installation checklist for common control points.
Inspect stone preparation
Confirm the right panel and orientation. Check kerfs, slots or holes for position, dimensions, break-out, cracks and chipping. Clean as required by the approved method. Never hammer a metal return into a tight slot or deepen a kerf casually at the façade.
Fit without unintended restraint
Install pads, shims, pins and clamps in the specified order. Use adjustment only in the designed direction and range. Ensure intended bearing contact is achieved without wedging the stone or locking a point that needs movement.
Tighten correctly
Use the specified fastener and tightening procedure. A generic torque value cannot be assigned to every clamp because thread, grade, lubrication, coating and joint design differ. Prevent rotation or slip while tightening and record results when required.
Inspect before concealment
Check location, orientation, fastener engagement, seating, slot position, clearances, damage and alignment. Complete required pull tests, torque checks, witness points or photographs. Resolve non-conformance before insulation or the next panel blocks access.
Protect the finished assembly
Apply approved protection or touch-up processes, remove debris and maintain drainage paths. Do not leave temporary wedges as permanent supports unless the detail expressly requires them. Record as-built changes and release the zone through the project inspection process.
Quality checks that make the product description verifiable
“Premium quality” is not an inspection criterion. Convert expectations into characteristics that can be measured or evidenced. The drawing and purchase specification should establish acceptance limits, inspection frequency and required records.
Dimensional inspection may cover finished height and projection, width, thickness, return lengths, bend angles, hole and slot positions, diameter, edge distance and flatness. Visual examination can identify burrs, cracks around bends, incomplete welds, excessive distortion, coating damage, contamination or poor surface condition. Sampling rules should be agreed for the order rather than improvised after a problem appears.
Where project documents require material verification, testing, weld inspection or particular certificates, include them in the enquiry. The quotation should distinguish standard supply documentation from additional testing or third-party inspection. Retain links between certificates, batch labels, inspection reports and dispatched packages.
Suggested hold points
- Drawing review: geometry, material, function and interfaces approved.
- First-off: sample dimensions and fit accepted before repetition.
- Incoming site check: quantity, identity, condition and records verified.
- Backing inspection: anchors or channels accepted before stone fixing.
- Stone preparation: kerfs, slots, holes and edges checked before assembly.
- Pre-concealment: installed position, contact, fasteners and movement verified.
- Handover: non-conformances closed and required records compiled.
An approved inspection does not transfer design responsibility to the supplier or inspector. It demonstrates conformity with the stated checks within the agreed scope.
Recurring risks a well-specified C clamp helps control
Wrong projection
A clamp that is too shallow may not reach the coordinated plane; one that is too deep may be forced, excessively packed or left outside its intended adjustment. Survey the backing and state the cavity dimension and tolerance strategy.
Local stone damage
Tight slots, sharp metal contact, insufficient edge distance, poor fabrication or forced alignment can chip or crack the panel. Match the stone-side detail, check the prepared edge and use approved pads or shims where specified.
Clamp distortion
Bending a finished item on site changes its geometry and may affect material condition, coating and fit. If site conditions differ, stop and issue a revised detail rather than turning field modification into an undocumented production process.
Fastener mismatch
A bolt of the right diameter may still have the wrong grade, thread, length, washer, coating or material compatibility. Specify the joint as an assembly and verify adequate engagement, seating and approved tightening.
Corrosion hidden in the cavity
Moisture, salts, contaminated surfaces and mixed metals can degrade concealed hardware. Choose material for exposure, preserve drainage, control fabrication cleanliness and inspect protective finishes before the area becomes inaccessible.
Blocked movement
Over-tightening, misplaced clamps, hard packing or unplanned extra fixings can restrain a point designed to move. Follow the fixed/sliding logic on the approved detail and keep joints clear of debris.
Weak or unknown substrate
The clamp cannot compensate for an anchor placed in cracked, hollow, deteriorated or unverified backing. Confirm base material and anchor suitability, and investigate deviations before installation.
Untraceable substitution
Mixing near-identical clamps on site can put the wrong configuration at a critical location. Mark packages and item codes, segregate revisions and record installed batches where required.
Buying C type cladding clamps for a project or repeat requirement
Shree OSR Enterprises serves contractors, façade and glazing companies, stone processors, fabricators, EPC purchasing teams, developers, distributors and industrial buyers seeking cladding hardware in India. The most efficient commercial discussion begins with a defined scope. Send the clamp reference, approved or tender-stage drawing, material, quantity, required documentation and delivery city.
For a tender, identify which details remain provisional and when approved-for-construction information is expected. For an active project, state required-on-site dates and whether the quantity will be released in stages. For a repeat order, reference the previous purchase order and confirm whether the drawing revision, material, finish, packaging or site conditions have changed. “Same as last time” should be supported by a traceable item reference.
Price comparison should use the same technical and commercial basis. A quote for a bare clamp is not directly comparable with an assembly including pins, bolts, washers, anchors, special packing, certificates or inspection. Confirm tax, freight, unloading, validity, payment terms, dispatch basis and exclusions.
Technical reading for a better-prepared enquiry
These links deepen the subject without repeating the product page. Open them when the matching question arises during design, procurement or installation.
C clamp versus Z clamp
Use the comparison when the team is choosing between returned and offset profiles or needs to understand why the letter shape alone is not enough.
Explore stone cladding clamp guides →Stone anchor purchasing
Use this when building a complete BOM around panel, bracket, pin, fastener, anchor and supporting construction rather than sourcing isolated pieces.
Read the façade contractor’s guide →High-rise specification
Use this for the additional coordination, wind, movement, mock-up, access and quality concerns that become significant on tall façades.
Review high-rise clamp specification →Material comparison
Use this when a proposal compares stainless and mild-steel hardware or treats day-one strength as the only material criterion.
Compare SS and mild-steel clamps →Control the product from drawing revision to installed record
Cladding hardware is repetitive: a small information error can be repeated hundreds or thousands of times before it is noticed. Revision control, package identification and delivery records therefore matter as much as the clarity of the initial description. A strong supply process keeps the approved component recognisable from quotation through manufacture, dispatch, site storage and final installation.
Freeze the commercial basis
List every controlled document in the enquiry and purchase order. A drawing number without its revision is incomplete. If the architect’s detail, façade consultant’s calculation, fabricator’s shop drawing and procurement schedule use different item names, create a cross-reference so everyone is discussing the same C clamp.
- Mark tender, approval, construction and as-built status clearly.
- Identify dimensions that remain subject to survey.
- Separate technical alternates from the compliant base offer.
- Record approved clarifications in the purchase order.
- State who is authorised to release a changed revision.
When a later drawing changes projection, material, opening position or quantity, issue a written change. Confirm what has already been produced and whether it can be used, reworked under an approved procedure or must be segregated. Do not rely on an informal call to override controlled information.
Package for identification and site sequence
Small clamps are easy to mix, particularly when several profiles share the same finish. Package by item code, grade, handed orientation, drawing revision or elevation release as the project requires. Labels should remain legible through normal handling and should not introduce adhesive contamination on critical surfaces.
- State pieces per pack and total packs per dispatch.
- Protect returns, pins and threads from impact damage.
- Keep different stainless grades or coated items separated.
- Include a packing list linked to purchase-order lines.
- Coordinate pack weight and size with site lifting limits.
Plan delivery around storage capacity and installation sequence, not only the earliest possible dispatch. Hardware arriving months before use can be lost, contaminated or mixed with later revisions. If staged deliveries are needed, agree minimum releases, balance tracking and how partial quantities will be identified.
Retain evidence that answers future questions
The close-out file should make it possible to identify what was approved, supplied, inspected and installed. The exact package will vary by contract, but it may include approved drawings, material documents, inspection reports, delivery notes, non-conformance closures, test results, photographs and as-built changes.
- Link certificates to product batches where required.
- Record approved repairs and concessions.
- Close missing or damaged quantity reports.
- Retain mock-up and first-off approval information.
- Provide maintenance teams with relevant access cautions.
Concealed façade hardware is difficult to revisit after completion. Records cannot make a poor connection safe, but good records support accountability, investigation and maintenance. They also help the buyer prepare a more accurate repeat order without guessing from a generic product photograph.
Durability and responsible procurement start with fewer wrong parts
For cladding hardware, responsible purchasing is not a vague environmental slogan. It begins with designing an appropriate, durable connection; ordering the right quantity; avoiding rejected fabrication; protecting material in storage; and retaining information that makes future maintenance possible. The lowest-mass or lowest-price clamp is not automatically the lowest-impact choice if premature corrosion, panel removal or wholesale replacement follows.
Coordinate before fabrication
Resolve the cavity, interfaces and hole positions digitally or through a mock-up before bulk release. Early coordination can reduce rework, emergency air freight, duplicated production and waste caused by a clamp that cannot be installed. Consolidate identical approved profiles where technically appropriate, while keeping distinct functions clearly coded.
Order from a measured schedule
Use elevation quantities and an agreed allowance rather than an untraceable rounded estimate. Separate spare pieces from installed quantities and store them with identification. A controlled spare can support future repair; an unidentified box of mixed revisions usually cannot.
Protect service life
Select material and compatible companion parts for the expected environment. Maintain drainage and avoid contamination. The environmental cost of a more durable grade should be assessed against access difficulty, replacement disruption and the consequences of concealed corrosion over the building’s intended life.
Request evidence carefully
Ask for the documentation that the project genuinely needs and define its format before ordering. Duplicate or unclear paperwork creates administrative work without improving assurance. Conversely, omitting essential material identity or inspection records can make a delivered batch difficult to approve and reuse.
Design for inspectability
Where the façade strategy allows it, consider how critical interfaces will be inspected during construction and whether representative zones remain accessible later. Do not seal or cover rejected work. Photographs should include a location or reference marker so they can be related to the elevation rather than becoming an unsearchable gallery.
Do not overstate environmental claims
A clamp should not be labelled “green,” “maintenance-free” or fully recyclable without a defined basis. Material recovery depends on the actual alloy, attachments, contamination, demolition method and local recycling route. Use project-specific, verifiable information and avoid turning a procurement advantage into an unsupported performance promise.
Frequently asked questions about C type cladding clamps
What is a C type cladding clamp?
It is a formed metal component with a broadly C-shaped side profile, used in selected stone or façade fixing arrangements. Its returns and web can create a particular offset or interface between the stone-side connection and supporting hardware. The name does not define dimensions, material, capacity or installation method. Those must come from the project drawing and specification.
Is a C clamp suitable for marble and granite?
It may be used in an engineered fixing detail for marble, granite or other dimension stone, but suitability cannot be decided from the stone name alone. The designer should consider the stone’s tested properties, panel dimensions, thickness, veining or bedding, fabrication, edge distances, support positions, actions and environment. The clamp and stone interface must be coordinated together.
Do you supply stainless steel C type cladding clamps?
Shree OSR Enterprises can review enquiries for C type cladding clamps and related stainless-steel stone-fixing hardware. State the exact stainless grade required by the project rather than writing only “SS.” Include thickness, dimensions, finish, quantity, certificates and delivery location. Availability and the final supply scope should be confirmed in the written quotation.
What sizes are available?
A responsible quotation should be based on the actual profile: overall dimensions, return lengths, width, metal thickness, bend radii and hole or slot pattern. Because project details differ, this page does not claim one universal size range. Send a dimensioned drawing, approved sample or complete schedule so the required standard or project-specific route can be checked.
Can you manufacture a C clamp from our drawing?
Drawing-led requirements can be reviewed for technical completeness and manufacturing feasibility. Provide a revision-controlled drawing that identifies material, finished geometry, openings, bends, welds or pins, tolerances, finish, quantity and inspection documents. Any proposed change should be disclosed and approved; it should not be incorporated silently because it simplifies fabrication.
How much load can a C type stone clamp carry?
There is no single capacity for every C clamp. Performance depends on profile and material, but also on the stone interface, fastener, anchor, substrate, stand-off, workmanship and load direction. The project engineer should design or verify the complete connection using applicable evidence and safety factors. Do not use thickness alone or a value from a visually similar clamp as the design capacity.
What is the difference between a C clamp and a Z clamp?
A C profile generally has two returns connected by a web; a Z profile has two changes of direction forming an offset between faces. Either could be configured in multiple ways. The correct choice depends on the required planes, support or restraint role, adjustment, access and load path. They should not be substituted without design review.
Can a C clamp be used for dry stone cladding?
A C clamp may form part of a dry-fixed mechanical system when shown in the approved design. Dry fixing normally involves multiple coordinated parts and building-envelope details. The clamp alone does not resolve anchors, rails, drainage, ventilation, insulation, fire stopping, joints or movement. See the dry stone cladding clamp range for related enquiries.
Which stainless-steel grade should I choose?
The project specifier should select the grade for the environmental exposure, service life, connected metals, strength requirements and applicable standards. Interior, urban exterior, coastal and industrial conditions can require different assessment. Ask for the exact grade in writing and verify delivered material through the documentation and controls required by the project.
Should slotted holes be used for adjustment?
Slots can provide adjustment in a defined direction, but their size and orientation change the clamp’s net section, bearing and possible movement. The design should establish the permitted range and final fastener position. Installers should not lengthen a slot or park the bolt at an extreme position unless the approved detail permits it.
Can installers bend the clamp on site?
Field bending should not be treated as a routine way to correct an unsuitable projection. It changes geometry and can damage the surface, coating, bend zone or connected parts. Stop, record the dimensional conflict and obtain an approved revised detail or replacement component. Any permitted modification needs a documented procedure and inspection.
What information is needed to get a price?
Send the item or drawing reference, dimensions, thickness, material grade, finish, hole and slot details, companion parts, quantity, certificates or testing, packing, delivery city and required date. State whether the requirement is tender-stage, approved for construction, a sample or a repeat order. This makes quotations more accurate and easier to compare.
Can I order only the clamp, or a coordinated assembly?
State what needs to be included. Depending on the product and requirement, an enquiry may involve the formed clamp alone or related pins, bolts, nuts, washers, stone-fixing anchors or channels. The quotation should list inclusions and exclusions so the site does not discover a missing interface after delivery.
Do you support bulk and project supply across India?
Shree OSR Enterprises handles industrial and construction-hardware enquiries from buyers across India. Provide total quantity, planned releases, delivery location and schedule so manufacturing or sourcing, inspection, packing and dispatch can be coordinated. Lead time and availability should be confirmed for the specific approved requirement.
How should delivered clamps be inspected?
Check item code, drawing revision, quantity, material documentation, principal dimensions, holes or slots, bends, surface condition, burrs, distortion and included fasteners. Use the agreed sampling and acceptance plan. Segregate non-conforming or unidentifiable items and do not install them while awaiting disposition.
Send the C clamp drawing, quantity and delivery city
Get a quotation based on the actual profile and supply scope. Include material grade, thickness, holes or slots, finish, companion fasteners, documentation and required date. If the detail is still at tender stage, mark the provisional information clearly.